Difference between revisions of "Eyesis4Pi User Guide - Recording"
From ElphelWiki
| Line 14: | Line 14: | ||
* Connect the PC to the Gigabit port of the switch. | * Connect the PC to the Gigabit port of the switch. | ||
'''''Note:''' Do not confuse the Gigabit port with the Console port.'' | '''''Note:''' Do not confuse the Gigabit port with the Console port.'' | ||
| + | |||
| + | {| | ||
| + | |- | ||
| + | |[[File:Switch panel comments.jpeg|600px|thumb|Fig.1 Netgear FS726TP]] | ||
| + | |} | ||
| + | |||
<br/><hr/> | <br/><hr/> | ||
* Configure the PC's network settings: | * Configure the PC's network settings: | ||
| Line 33: | Line 39: | ||
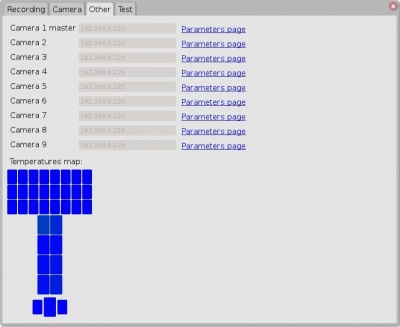
=====1. All the modules are online===== | =====1. All the modules are online===== | ||
Check the '''Temperatures Map''' under '''Other''' tab. If there are 0 black rectangles then all the modules are working. | Check the '''Temperatures Map''' under '''Other''' tab. If there are 0 black rectangles then all the modules are working. | ||
| + | {| | ||
| + | |- | ||
| + | |[[File:Other tab.jpeg|400px|thumb|Fig.2 Other-tab]] | ||
| + | |} | ||
=====2. Images===== | =====2. Images===== | ||
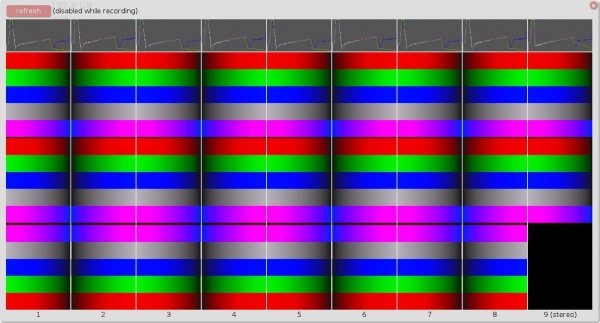
Go to the Camera tab, press jpeg button and turn on the test pattern. Then refresh Previews. The correct test pattern will consist from the following tiles: | Go to the Camera tab, press jpeg button and turn on the test pattern. Then refresh Previews. The correct test pattern will consist from the following tiles: | ||
{| | {| | ||
|- | |- | ||
| − | |[[File: | + | |[[File:Eyesis4pi test pattern.jpeg|600px|thumb|Fig.3 Eyesis4Pi Test Pattern]] |
|} | |} | ||
=====3. GPS locked===== | =====3. GPS locked===== | ||
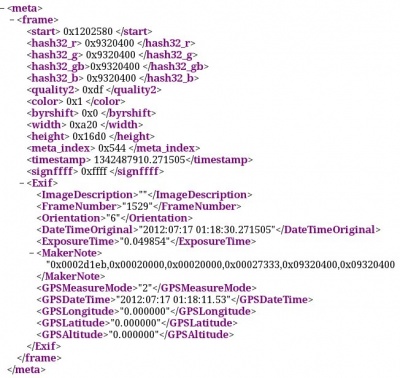
| Line 44: | Line 54: | ||
http://192.168.0.221:8081/meta | http://192.168.0.221:8081/meta | ||
</font> | </font> | ||
| + | |||
| + | {| | ||
| + | |- | ||
| + | |[[File:Gps coords.jpeg|400px|thumb|Fig.4 GPS coordinates]] | ||
| + | |} | ||
| + | |||
=====4. Internal CF cards for IMU/GPS log===== | =====4. Internal CF cards for IMU/GPS log===== | ||
Look for hda1 and hdb1 at: | Look for hda1 and hdb1 at: | ||
| Line 49: | Line 65: | ||
http://192.168.0.221/phpshell.php?command=cat%20/proc/partitions%20|%20grep%20%22hd%22 | http://192.168.0.221/phpshell.php?command=cat%20/proc/partitions%20|%20grep%20%22hd%22 | ||
</font> | </font> | ||
| + | {| | ||
| + | |- | ||
| + | |[[File:Cf cards.jpeg|thumb|Fig.5 CF cards]] | ||
| + | |} | ||
| + | |||
<br/><hr/> | <br/><hr/> | ||
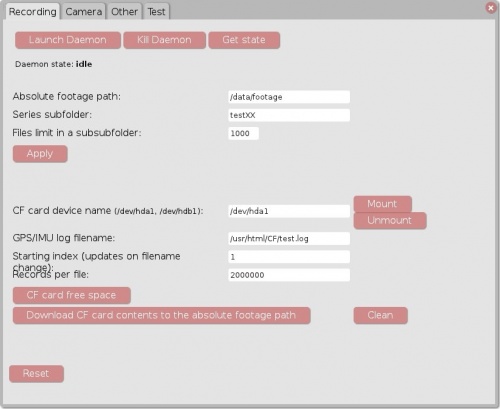
| − | * Check paths at the '''Settings''' -> '''Recording'''-tab | + | * Check paths at the '''Settings''' -> '''Recording'''-tab |
| + | <font size='2'> | ||
| + | '''Absolute footage path''' - the path to the folder where all the footage series are stored. '''Must be writable to everyone.''' | ||
| + | '''Series subfolder''' - created automatically | ||
| + | '''Files limit in a subfodler''' - number of files stored in a subfolder inside '''Series subfolder''' | ||
| + | |||
| + | '''CF card device name''' - GPS/IMU log is saved to the internal CF cards. On the master camera they are /dev/hda1 & /dev/hdb1 | ||
| + | '''GPS/IMU log file name''' - absolute path (in the master camera)+ log base name | ||
| + | '''Starting index''' - logs are named as follows - '''[base_name]-[index]''' | ||
| + | '''Records per file''' - number of records per log file. New file: an incremented index is added to the base name. | ||
| + | </font> | ||
| + | {| | ||
| + | |- | ||
| + | |[[File:Recording tab.jpeg|500px|thumb|Fig.6 Recording-tab]] | ||
| + | |} | ||
| + | |||
<br/><hr/> | <br/><hr/> | ||
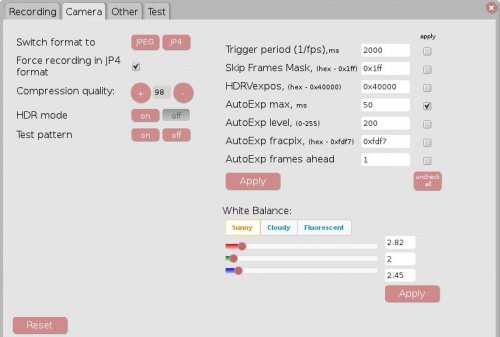
| − | * Check camera settings at the '''Settings''' -> '''Camera'''-tab | + | * Check camera settings at the '''Settings''' -> '''Camera'''-tab |
| + | |||
| + | <font size='2'> | ||
| + | '''Trigger period,ms ''' - 1/FPS. | ||
| + | '''Skip frames mask''' - hex 0x1ff - bit[8]=enable, bits[7:0] - '''1''' - record frame, '''0''' - skip frame - in an 8-frame sequence. | ||
| + | '''HDRVexpos''' - in the HDR mode - the darker frame multiplication coefficient to get exposure for the lighter frame. | ||
| + | '''AutoExp max, ms''' - the autoexposure value limit. | ||
| + | '''AutoExp level''' - value of a pixel at which the autoexposure works. | ||
| + | '''AutoExp fracpix''' - number of pixels below the Autoexp level. | ||
| + | '''AutoExp frame ahead''' - number of previous frames used for calculatin the current frame exposure. | ||
| + | '''Compression quality''' - JP4/JPEG compression quality. | ||
| + | |||
| + | '''HDR mode''' - at the fps rate the dark and the bright images alternate. | ||
| + | </font> | ||
| + | {| | ||
| + | |- | ||
| + | |[[File:Camera tab.jpeg|500px|thumb|Fig.7 Camera-tab]] | ||
| + | |} | ||
| + | |||
<br/><hr/> | <br/><hr/> | ||
* '''Record'''-button to start recording | * '''Record'''-button to start recording | ||
Revision as of 21:25, 19 July 2012
Contents
Package
- Eyesis4Pi
- Switch 3CRDSF9PWR / Netgear FS726TP
- PC
Quick Start
- Turn the switch on.
- Connect the camera's ethernet cables to the PoE enabled ports. Eyesis4Pi's default IP addresses:
192.168.0.221-229
- Connect the PC to the Gigabit port of the switch.
Note: Do not confuse the Gigabit port with the Console port.
- Configure the PC's network settings:
IP address: 192.168.0.xxx (example, 192.168.0.68)
Mask:       255.255.255.0
- Open the GUI page (the address is bookmarked in the Firefox and in the Chrome). The GUI address is:
http://127.0.0.1/eyesisgui/index.html
- Go to the "Settings" -> "Test"-tab:
System tests
0. Open the tests page
Open the test page-link
1. All the modules are online
Check the Temperatures Map under Other tab. If there are 0 black rectangles then all the modules are working.
2. Images
Go to the Camera tab, press jpeg button and turn on the test pattern. Then refresh Previews. The correct test pattern will consist from the following tiles:
3. GPS locked
Check the coordinates at the main module:
http://192.168.0.221:8081/meta
4. Internal CF cards for IMU/GPS log
Look for hda1 and hdb1 at:
http://192.168.0.221/phpshell.php?command=cat%20/proc/partitions%20%7C%20grep%20%22hd%22
- Check paths at the Settings -> Recording-tab
Absolute footage path - the path to the folder where all the footage series are stored. Must be writable to everyone.
Series subfolder - created automatically
Files limit in a subfodler - number of files stored in a subfolder inside Series subfolder

CF card device name - GPS/IMU log is saved to the internal CF cards. On the master camera they are /dev/hda1 & /dev/hdb1
GPS/IMU log file name - absolute path (in the master camera)+ log base name
Starting index - logs are named as follows - [base_name]-[index]
Records per file - number of records per log file. New file: an incremented index is added to the base name.
- Check camera settings at the Settings -> Camera-tab
Trigger period,ms  - 1/FPS.
Skip frames mask - hex 0x1ff - bit[8]=enable, bits[7:0] - 1 - record frame, 0 - skip frame - in an 8-frame sequence.
HDRVexpos - in the HDR mode - the darker frame multiplication coefficient to get exposure for the lighter frame.
AutoExp max, ms - the autoexposure value limit.
AutoExp level - value of a pixel at which the autoexposure works.
AutoExp fracpix - number of pixels below the Autoexp level.
AutoExp frame ahead - number of previous frames used for calculatin the current frame exposure.
Compression quality - JP4/JPEG compression quality.
HDR mode - at the fps rate the dark and the bright images alternate.
- Record-button to start recording
- Stop-button for stop.
- After stopping - go to the Settings -> Recording-tab to download the IMU/GPS log.
- Check the footage at the Absolute footage path - each panorama set should consist of 8 images named with a timestamp of when it was taken plus the index of the camera (seconds_microseconds_index.jp4):
1334548426_780764_1.jp4
1334548426_780764_2.jp4
...
1334548426_780764_9.jp4
Note: Missing files most likely means that the FPS is too high.

