Difference between revisions of "Camogmgui"
OneArtPlease (talk | contribs) (→Sandboxcam) |
(→Web-based Graphical User Interface for camogm) |
||
| (23 intermediate revisions by 4 users not shown) | |||
| Line 1: | Line 1: | ||
| − | == | + | ==Web-based Graphical User Interface for camogm== |
| − | + | The web interface for ''camogm'' is intended for recording of video or images to internal or external storage just from your browser. Elphel393 series cameras support recording in two modes: normal recording to a file system and fast recording to a raw disk or disk partition without any file system on it. The process of images extraction from raw partition is described on [[Extracting_images_from_raw_partition | this page]]. | |
| + | ==Prerequisites== | ||
| + | Disk should be prepared before it can be used in either of the two modes of recording. Normal recording assumes there is at least one partition with a file system. Follow [[HDD_Format | this guide]] from step 1 to step 4 to prepare a partition for normal recording if your disk is not partitioned yet. Fast recording mode requires at least one partition without file system. Follow [[HDD_Format | this guide]] from step 1 to step 3 to prepare such partition. As alternative, the whole disk can be used as a fast recording buffer and no actions with disk required in this case given that the disk in not partitioned. | ||
| − | == | + | ==Interface== |
| − | The | + | ===Main window=== |
| + | Open the following link in your browser to start ''camogmgui'' | ||
| + | http://192.168.0.9/camogmgui.php | ||
| + | [[File:Camogmgui main.png|center|alt=Main window]] | ||
| + | The main window of the program consists of several areas (marked in red on the image) and two of them, preview (1) and buffers usage (2), are folded by default. The third area displays a list of files recorded in normal mode to some directory on the mounted disk. This list is empty right after start and you need to press ''Reload'' button to refresh the list. ''Create folder'' button makes new subdirectory in the current directory and ''Set Target Folder'' sets selected directory as a location for recorded files. The group of tabs on the right side contains status information and controls for recording. The first tab of the group, ''Status'', shows status of all ports and some recording statistics. Some fields on this tab are empty right after start but they will be updated as soon as recording has started. By default, the update period during recording is one second. | ||
| − | + | ===Preview=== | |
| + | [[File:Camogmgui preview.png|center|alt=Preview panel]] | ||
| + | The ''Live-Preview'' link opens a thumbnail of a captured image and some controls for preview capturing. Preview image can be updated manually each time the ''Update'' button is pressed or automatically within a predefined period of time if ''Auto Update'' check box is checked. The ''Size'' buttons allows you to adjust the image size. Preview is displayed for a single channel selected by ''Port'' radio buttons. | ||
| − | + | ===Buffers usage=== | |
| + | [[File:Camogmgui buffers.png|center|alt=Buffers usage]] | ||
| + | The ''Show Buffers'' link opens several bars indicating the usage of in-camera memory buffers. Each bar corresponds to a single sensor port and shows free space left in buffer and the space occupied by images which have not been recorded yet. The status of these bars is updated along with the content of the ''Status'' tab. Click on any bar to fold these indicators back to link. The ''HELP'' link below bars leads to this page. | ||
| − | + | ===File names tab=== | |
| − | + | [[File:Camogmgui filenames.png|right|alt=File names tab]] | |
| − | + | The ''Filenames'' tab controls file naming scheme for recorded files. There are three schemes available: | |
| + | * Unix time stamps. The name of a file is created from image time stamp and channel number extracted from Exif. The example of such naming scheme is shown on the screenshot of main window. This is a default scheme. | ||
| + | * Prompt user for file name after recording | ||
| + | * Advanced naming scheme. This scheme assembles file names using several predefined fields. | ||
| + | The settings on this tab are ineffective in fast recording mode. | ||
| + | <br style="clear:both" /> | ||
| − | + | ===Format tab=== | |
| + | [[File:Camogmgui format norm.png|right|alt=Normal recording mode]] | ||
| + | [[File:Camogmgui format fast.png|right|alt=Fast recording mode]] | ||
| + | The ''Format'' tab controls recording mode and path for resulting files. The group of radio buttons named ''Format'' selects resulting file format. ''Use fast recording'' check box switches ''camogm'' to fast recording mode and disables ''Format'' and ''Directory'' settings because they are ineffective in this mode. The ''Directory'' text field sets full path to a directory where files are saved. Note, that this is a path in camera system, not on your PC. The ''Devices'' panel shows a list of disks or partitions available for recording. The contents of this panel depends on the mode of operation: in normal recording mode, the list of mountable partitions is shown, and in fast recording mode the list of partitions or disks without file system is presented. The group of controls below devices list allows you to enable or disable ''camogm'' debug output, save this output to a file and adjust its level of verbosity. Do not forget to press ''OK'' button before recording to apply the settings. | ||
| + | <br style="clear:both" /> | ||
| + | |||
| + | ===Advanced tab=== | ||
| + | [[File:Camogmgui advanced.png|right|alt=Advanced tab]] | ||
| + | The ''Advanced'' tab controls how video files are recorded. The settings on this tab allows you to limit the size and duration of single video file. When either limit is reached, ''camogm'' starts recording to a new file. The settings on this tab are ineffective in fast recording mode. | ||
| + | <br style="clear:both" /> | ||
| + | |||
| + | ==Plans for Future Releases== | ||
| + | * Full Audio Support | ||
| + | * Full Geotagging Support | ||
==Changelog== | ==Changelog== | ||
| + | [[Image:Camogmgui08.jpg|thumb|camogmgui Version 0.8]] | ||
| + | '''Version 0.8''' | ||
| + | |||
| + | * added support for USB sound devices, underlying camogm2 is still buggy though and therefore disabled | ||
| + | * added support for geotagging, underlying camogm2 is still buggy though and therefore disabled | ||
| + | * mounting of different devices/partitions like external SATA devices is now possible, still needs testing though | ||
| + | * updates free hdd space dynamically while recording | ||
| + | * added buffer graph, still unexpected behaviour | ||
| + | * used different method to set quicktime mov as default format | ||
| + | * bug fixes | ||
| + | |||
| + | |||
| + | No release URL this time as from now on latest source files need to be obtained directly from the CVS tree. | ||
| + | |||
| + | |||
| + | |||
| + | ---- | ||
| + | '''Version 0.7''' | ||
| + | |||
| + | * updated to work with 8.0 firmware | ||
| + | * advanced naming scheme tab added | ||
| + | * debug output added | ||
| + | * bug fixes | ||
| + | |||
| + | [http://www.oneartplease.com/elphel/camogmgui_0_7.zip camogmgui_0_7.zip] | ||
| + | |||
| + | |||
| + | ---- | ||
| + | [[Image:Camogmgui_0_6.jpg|thumb|camogmgui Version 0.6]] | ||
| + | '''Version 0.6''' | ||
| + | |||
| + | I think we are getting close to a first major 1.0 release. As always please provide feedback. | ||
| + | |||
| + | * sensor state info added | ||
| + | * added some help text | ||
| + | * quicktime *.mov is now the default format | ||
| + | * the filebrowser can now go into subfolders, also create them or set them as target for recordings | ||
| + | * live video preview image added in expandable tab | ||
| + | * tabs remember their state across page reloads | ||
| + | * bug fixes | ||
| + | |||
| + | [http://community.elphel.com/files/camogmgui/camogmgui_0_6.zip camogmgui_0_6.zip] | ||
| + | |||
| + | |||
| + | ---- | ||
| + | [[Image:Camogmgui_0_5.jpg|thumb|camogmgui Version 0.5]] | ||
| + | '''Version 0.5''' | ||
| + | |||
| + | * good bye bulky placeholder design -> Hello fancy real visual interface | ||
| + | * camogm is now automatically started from within the script. | ||
| + | * hdd can be mounted with a single click | ||
| + | * filebrowser is is alot fancier now | ||
| + | * frameskip / timelapse problem fixed | ||
| + | * spry applets added for even more responsive and feature rich layout | ||
| + | |||
| + | [http://www.oneartplease.com/elphel/camogmgui_0_5.zip camogmgui_0_5.zip] | ||
| + | |||
| + | |||
| + | ---- | ||
| + | [[Image:Camogmgui_0_4.jpg|thumb|camogmgui Version 0.4]] | ||
| + | '''Version 0.4''' | ||
| + | |||
| + | Anything hdd mounting related can now be done directly inside the gui. I also added a filebrowser so recorded videos can immediately be downloaded. Advanced settings added. The whole script does not rely on any external resources anymore. | ||
| + | |||
| + | I tried starting camogm from within the script as well, but ran into some problems, stay tuned. | ||
| + | |||
| + | So still: before the script can be used camogm must be started manually via shell: | ||
| + | camogm /var/state/camogm_cmd & | ||
| + | |||
| + | [http://www.oneartplease.com/elphel/camogmgui_0_4.zip camogmgui_0_4.zip] | ||
| + | |||
| + | |||
| + | ---- | ||
| + | |||
| + | '''Version 0.3''' | ||
| + | |||
| + | Some decent progess here. Lots of ajax scripting done to show filesize, datarate, etc. live while recording video files. Record and stop-record commands are also ajax transmitted which makes the GUI much more responsive. Stability issues seem to be solved now as well. | ||
| + | |||
| + | Again: before the script can be used camogm must be started manually via shell: | ||
| + | camogm /var/state/camogm_cmd & | ||
| + | |||
| + | [http://www.oneartplease.com/elphel/camogmgui_0_3.zip camogmgui_0_3.zip] | ||
| + | |||
| + | |||
| + | ---- | ||
| + | |||
'''Version 0.2''' | '''Version 0.2''' | ||
| − | I color labeled the parts of the gui and their current grade of operation. Record Format and destination directory are now read from xml output of camogm to fill in the form. The script now checks if both camogm and compressor are running. If the compressor is not running it can be started directly in the GUI. Camogm can not be started in the GUI yet. | + | I color labeled the parts of the gui and their current grade of operation. Record Format and destination directory are now read from xml output of camogm to fill in the form. The script now checks if both camogm and compressor are running. If the compressor is not running it can be started directly in the GUI. Camogm can not be started in the GUI yet (crashes...). |
Before the script can be used camogm must be started manually via shell: | Before the script can be used camogm must be started manually via shell: | ||
| Line 27: | Line 141: | ||
[http://www.oneartplease.com/elphel/camogmgui_0_2.zip camogmgui_0_2.zip] | [http://www.oneartplease.com/elphel/camogmgui_0_2.zip camogmgui_0_2.zip] | ||
| + | |||
| + | ---- | ||
'''Version 0.1''' | '''Version 0.1''' | ||
| Line 35: | Line 151: | ||
[http://www.oneartplease.com/files/camogmgui.tar.gz camogmgui.tar.gz] | [http://www.oneartplease.com/files/camogmgui.tar.gz camogmgui.tar.gz] | ||
| + | |||
| + | ==Software Interface== | ||
| + | |||
| + | The GUI strongly relies on AJAX requests to update contents on the fly. These AJAX commands can be (re)used from external programs as well. | ||
| + | |||
| + | Access: | ||
| + | |||
| + | http://*camera-ip*/camogmgui/camogm_interface.php | ||
| + | |||
| + | The following commands are available: | ||
| + | |||
| + | '''start camogm as background deamon:''' | ||
| + | camogm_interface.php?cmd=run_camogm | ||
| + | does nothing if camogm is already running | ||
| + | |||
| + | '''show camogm xml status:''' | ||
| + | camogm_interface.php?cmd=status | ||
| + | |||
| + | returns something like this: | ||
| + | <camogm_state> | ||
| + | <state>"stopped"</state> | ||
| + | <compressor_state>"running"</compressor_state> | ||
| + | <file_name>""</file_name> | ||
| + | <frame_number>0</frame_number> | ||
| + | <file_duration>0.000000</file_duration> | ||
| + | <file_length>0</file_length> | ||
| + | <frame_period>0</frame_period> | ||
| + | <frames_skip>0</frames_skip> | ||
| + | <seconds_skip>0</seconds_skip> | ||
| + | <frames_skip_left>0</frames_skip_left> | ||
| + | <seconds_skip_left>0</seconds_skip_left> | ||
| + | <frame_width>0</frame_width> | ||
| + | <frame_height>0</frame_height> | ||
| + | <format>"mov"</format> | ||
| + | <exif>"yes"</exif> | ||
| + | <prefix>"/var/hdd/"</prefix> | ||
| + | <max_duration>60</max_duration> | ||
| + | <max_length>100000000</max_length> | ||
| + | <max_frames>16384</max_frames> | ||
| + | <timescale>1.000000</timescale> | ||
| + | <frames_per_chunk>10</frames_per_chunk> | ||
| + | <buffer_overruns>-1</buffer_overruns> | ||
| + | <buffer_minimal>12704544</buffer_minimal> | ||
| + | <buffer_free>1332800</buffer_free> | ||
| + | <buffer_used>18459072</buffer_used> | ||
| + | <circbuf_rp>-1</circbuf_rp> | ||
| + | <debug_output>"stderr"</debug_output> | ||
| + | <debug_level>1</debug_level> | ||
| + | <use_global_rp>"no"</use_global_rp> | ||
| + | <kml_enable>"no"</kml_enable> | ||
| + | <kml_used>"no"</kml_used> | ||
| + | <kml_path>""</kml_path> | ||
| + | <kml_horHalfFov>"20.000000"</kml_horHalfFov> | ||
| + | <kml_vertHalfFov>"15.000000"</kml_vertHalfFov> | ||
| + | <kml_near>"40.000000"</kml_near> | ||
| + | <kml_height_mode>"map ground level"</kml_height_mode> | ||
| + | <kml_height>"10.000000"</kml_height> | ||
| + | <kml_period>2</kml_period> | ||
| + | <kml_last_ts>0.000000</kml_last_ts> | ||
| + | </camogm_state> | ||
| + | |||
| + | '''start recording:''' | ||
| + | camogm_interface.php?cmd=start | ||
| + | |||
| + | '''stop recording:''' | ||
| + | camogm_interface.php?cmd=stop | ||
| + | |||
| + | '''rename file:''' | ||
| + | camogm_interface.php?cmd=file_rename&file_old=ABC&file_new=XYZ | ||
| + | |||
| + | returns errors if the file names are the same or if the target file name already exists. | ||
| + | |||
| + | '''mount partition:''' | ||
| + | |||
| + | mount the default partition /dev/hda1 at /var/hdd. Also create the required directory: | ||
| + | camogm_interface.php?cmd=mount | ||
| + | |||
| + | You can also supply 2 more arguments specifying custom partition and mountpoint: | ||
| + | |||
| + | For example: | ||
| + | camogm_interface.php?cmd=mount&partition=/dev/hdb1&mountpoint=/var/externalhdd | ||
| + | |||
| + | '''unmount partition:''' | ||
| + | |||
| + | To unmount a previously mounted partition you need to supply the mountpoint: | ||
| + | |||
| + | For example: | ||
| + | camogm_interface.php?cmd=umount&mountpoint=/var/externalhdd | ||
| + | |||
| + | '''list devices:''' | ||
| + | Shows xml information about connected media no matter if they are mounted or not: | ||
| + | |||
| + | camogm_interface.php?cmd=listdevices | ||
| + | |||
| + | with only the internal HDD this returns: | ||
| + | <camogm_interface> | ||
| + | <command>listdevices</command> | ||
| + | <listdevices> | ||
| + | <item> | ||
| + | <partition>/dev/hda1</partition> | ||
| + | <size>37.25 GB</size> | ||
| + | <mountpoint>/var/hdd</mountpoint> | ||
| + | <filesystem>ext2</filesystem> | ||
| + | </item> | ||
| + | </listdevices> | ||
| + | </camogm_interface> | ||
| + | |||
| + | '''create directory:''' | ||
| + | creates a new directory | ||
| + | |||
| + | Example creating a new directory called "newdir" in the /subdir/ which has to exist already: | ||
| + | camogm_interface.php?cmd=mkdir&name=/subdir/newdir | ||
| + | |||
| + | '''Get remaining free HDD Space:''' | ||
| + | camogm_interface.php?cmd=get_hdd_space | ||
| + | |||
| + | '''is HDD mounted:''' | ||
| + | camogm_interface.php?cmd=get_hdd_space | ||
| + | returns either the mountpoint or "no HDD mounted" | ||
| + | |||
| + | '''create HDD symlink:''' | ||
| + | camogm_interface.php?cmd=create_symlink | ||
| + | makes the HDD available over http by placing a symlink in the correct directory. | ||
| + | |||
| + | '''List files:''' | ||
| + | camogm_interface.php?cmd=list_files&dir=/ | ||
| + | returns an xml tree of the available files at a specified path with details like size and creation date: | ||
| + | <file> | ||
| + | <type>mov</type> | ||
| + | <name>1226615834_588046.mov</name> | ||
| + | <path>1226615834_588046.mov</path> | ||
| + | <size>2545355</size> | ||
| + | <date>13 Nov 2008 22:37:15</date> | ||
| + | </file> | ||
| + | |||
| + | |||
| + | '''set camogm record directory:''' | ||
| + | camogm_interface.php?cmd=set_prefix&prefix=XYZ | ||
| + | Tell camogm to record to this specified path. Also creates/sets a cookie called "directory" with the same value. | ||
| + | |||
| + | '''init the camera compressor:''' | ||
| + | camogm_interface.php?cmd=init_compressor | ||
| + | |||
| + | '''check USB audio hardware:''' | ||
| + | camogm_interface.php?cmd=check_audio_hardware | ||
| + | Returns connected (hotplugable) USB audio devices. | ||
| + | |||
| + | '''Play sound over USB audio device:''' | ||
| + | camogm_interface.php?cmd=test_audio_playback&soundfile=XYZ | ||
| + | Tests audio hardware by playing back a specific soundfile. | ||
| + | |||
| + | '''set quicktime as recording format:''' | ||
| + | camogm_interface.php?cmd=setmov | ||
| + | Tells camogm to use quicktime mov as format. | ||
Latest revision as of 12:34, 11 January 2017
Contents
[hide]Web-based Graphical User Interface for camogm
The web interface for camogm is intended for recording of video or images to internal or external storage just from your browser. Elphel393 series cameras support recording in two modes: normal recording to a file system and fast recording to a raw disk or disk partition without any file system on it. The process of images extraction from raw partition is described on this page.
Prerequisites
Disk should be prepared before it can be used in either of the two modes of recording. Normal recording assumes there is at least one partition with a file system. Follow this guide from step 1 to step 4 to prepare a partition for normal recording if your disk is not partitioned yet. Fast recording mode requires at least one partition without file system. Follow this guide from step 1 to step 3 to prepare such partition. As alternative, the whole disk can be used as a fast recording buffer and no actions with disk required in this case given that the disk in not partitioned.
Interface
Main window
Open the following link in your browser to start camogmgui
http://192.168.0.9/camogmgui.php
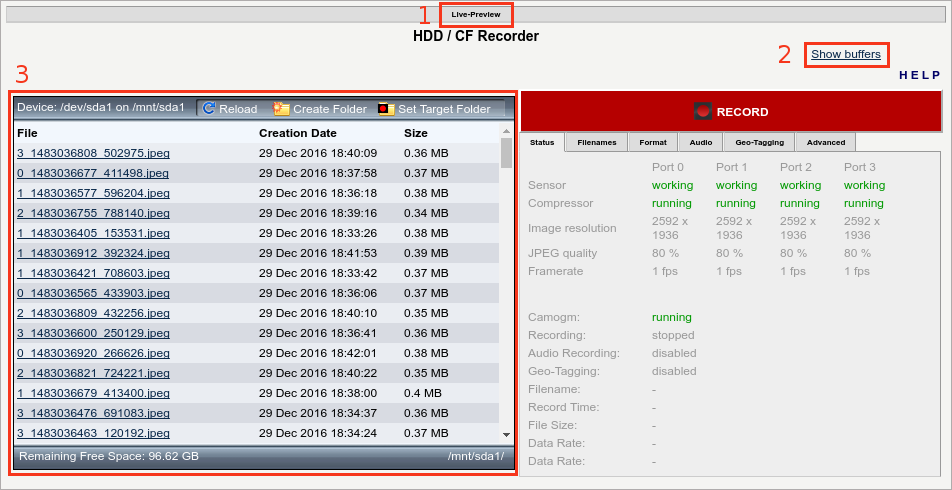
The main window of the program consists of several areas (marked in red on the image) and two of them, preview (1) and buffers usage (2), are folded by default. The third area displays a list of files recorded in normal mode to some directory on the mounted disk. This list is empty right after start and you need to press Reload button to refresh the list. Create folder button makes new subdirectory in the current directory and Set Target Folder sets selected directory as a location for recorded files. The group of tabs on the right side contains status information and controls for recording. The first tab of the group, Status, shows status of all ports and some recording statistics. Some fields on this tab are empty right after start but they will be updated as soon as recording has started. By default, the update period during recording is one second.
Preview
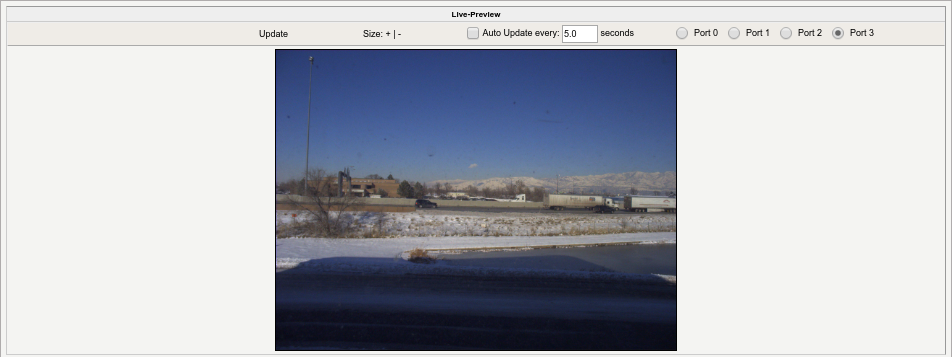
The Live-Preview link opens a thumbnail of a captured image and some controls for preview capturing. Preview image can be updated manually each time the Update button is pressed or automatically within a predefined period of time if Auto Update check box is checked. The Size buttons allows you to adjust the image size. Preview is displayed for a single channel selected by Port radio buttons.
Buffers usage
The Show Buffers link opens several bars indicating the usage of in-camera memory buffers. Each bar corresponds to a single sensor port and shows free space left in buffer and the space occupied by images which have not been recorded yet. The status of these bars is updated along with the content of the Status tab. Click on any bar to fold these indicators back to link. The HELP link below bars leads to this page.
File names tab
The Filenames tab controls file naming scheme for recorded files. There are three schemes available:
- Unix time stamps. The name of a file is created from image time stamp and channel number extracted from Exif. The example of such naming scheme is shown on the screenshot of main window. This is a default scheme.
- Prompt user for file name after recording
- Advanced naming scheme. This scheme assembles file names using several predefined fields.
The settings on this tab are ineffective in fast recording mode.
Format tab
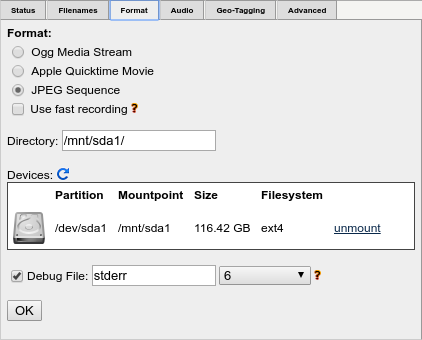
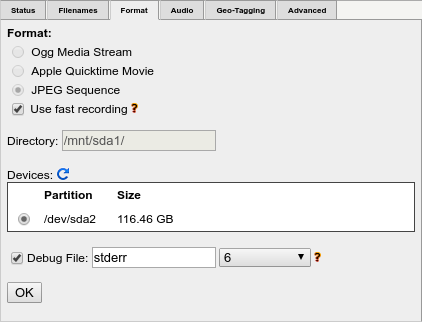
The Format tab controls recording mode and path for resulting files. The group of radio buttons named Format selects resulting file format. Use fast recording check box switches camogm to fast recording mode and disables Format and Directory settings because they are ineffective in this mode. The Directory text field sets full path to a directory where files are saved. Note, that this is a path in camera system, not on your PC. The Devices panel shows a list of disks or partitions available for recording. The contents of this panel depends on the mode of operation: in normal recording mode, the list of mountable partitions is shown, and in fast recording mode the list of partitions or disks without file system is presented. The group of controls below devices list allows you to enable or disable camogm debug output, save this output to a file and adjust its level of verbosity. Do not forget to press OK button before recording to apply the settings.
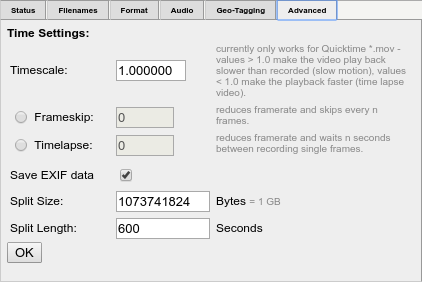
Advanced tab
The Advanced tab controls how video files are recorded. The settings on this tab allows you to limit the size and duration of single video file. When either limit is reached, camogm starts recording to a new file. The settings on this tab are ineffective in fast recording mode.
Plans for Future Releases
- Full Audio Support
- Full Geotagging Support
Changelog
Version 0.8
- added support for USB sound devices, underlying camogm2 is still buggy though and therefore disabled
- added support for geotagging, underlying camogm2 is still buggy though and therefore disabled
- mounting of different devices/partitions like external SATA devices is now possible, still needs testing though
- updates free hdd space dynamically while recording
- added buffer graph, still unexpected behaviour
- used different method to set quicktime mov as default format
- bug fixes
No release URL this time as from now on latest source files need to be obtained directly from the CVS tree.
Version 0.7
- updated to work with 8.0 firmware
- advanced naming scheme tab added
- debug output added
- bug fixes
Version 0.6
I think we are getting close to a first major 1.0 release. As always please provide feedback.
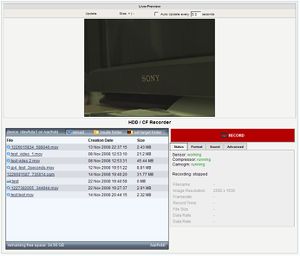
- sensor state info added
- added some help text
- quicktime *.mov is now the default format
- the filebrowser can now go into subfolders, also create them or set them as target for recordings
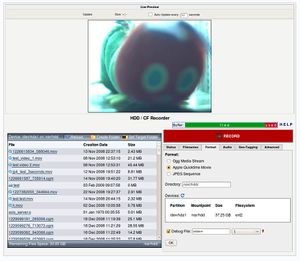
- live video preview image added in expandable tab
- tabs remember their state across page reloads
- bug fixes
Version 0.5
- good bye bulky placeholder design -> Hello fancy real visual interface
- camogm is now automatically started from within the script.
- hdd can be mounted with a single click
- filebrowser is is alot fancier now
- frameskip / timelapse problem fixed
- spry applets added for even more responsive and feature rich layout
Version 0.4
Anything hdd mounting related can now be done directly inside the gui. I also added a filebrowser so recorded videos can immediately be downloaded. Advanced settings added. The whole script does not rely on any external resources anymore.
I tried starting camogm from within the script as well, but ran into some problems, stay tuned.
So still: before the script can be used camogm must be started manually via shell:
camogm /var/state/camogm_cmd &
Version 0.3
Some decent progess here. Lots of ajax scripting done to show filesize, datarate, etc. live while recording video files. Record and stop-record commands are also ajax transmitted which makes the GUI much more responsive. Stability issues seem to be solved now as well.
Again: before the script can be used camogm must be started manually via shell:
camogm /var/state/camogm_cmd &
Version 0.2
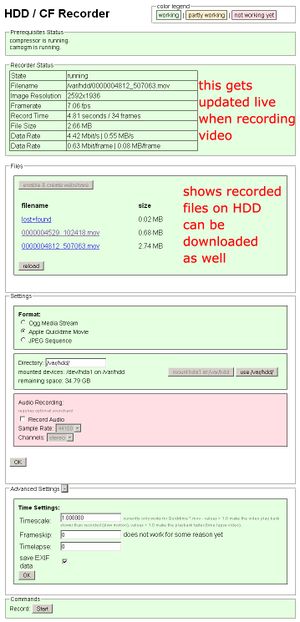
I color labeled the parts of the gui and their current grade of operation. Record Format and destination directory are now read from xml output of camogm to fill in the form. The script now checks if both camogm and compressor are running. If the compressor is not running it can be started directly in the GUI. Camogm can not be started in the GUI yet (crashes...).
Before the script can be used camogm must be started manually via shell:
camogm /var/state/camogm_cmd &
Version 0.1
Very basic functionality as of now, format/codec can be selected, target directory can be set, record start/stop, audio recording form is already in the file but not functional yet
(Wiki hosted download link will follow as soon as the wiki permits me to upload anything else than images)
Software Interface
The GUI strongly relies on AJAX requests to update contents on the fly. These AJAX commands can be (re)used from external programs as well.
Access:
http://*camera-ip*/camogmgui/camogm_interface.php
The following commands are available:
start camogm as background deamon:
camogm_interface.php?cmd=run_camogm
does nothing if camogm is already running
show camogm xml status:
camogm_interface.php?cmd=status
returns something like this:
<camogm_state>
<state>"stopped"</state>
<compressor_state>"running"</compressor_state>
<file_name>""</file_name>
<frame_number>0</frame_number>
<file_duration>0.000000</file_duration>
<file_length>0</file_length>
<frame_period>0</frame_period>
<frames_skip>0</frames_skip>
<seconds_skip>0</seconds_skip>
<frames_skip_left>0</frames_skip_left>
<seconds_skip_left>0</seconds_skip_left>
<frame_width>0</frame_width>
<frame_height>0</frame_height>
<format>"mov"</format>
<exif>"yes"</exif>
<prefix>"/var/hdd/"</prefix>
<max_duration>60</max_duration>
<max_length>100000000</max_length>
<max_frames>16384</max_frames>
<timescale>1.000000</timescale>
<frames_per_chunk>10</frames_per_chunk>
<buffer_overruns>-1</buffer_overruns>
<buffer_minimal>12704544</buffer_minimal>
<buffer_free>1332800</buffer_free>
<buffer_used>18459072</buffer_used>
<circbuf_rp>-1</circbuf_rp>
<debug_output>"stderr"</debug_output>
<debug_level>1</debug_level>
<use_global_rp>"no"</use_global_rp>
<kml_enable>"no"</kml_enable>
<kml_used>"no"</kml_used>
<kml_path>""</kml_path>
<kml_horHalfFov>"20.000000"</kml_horHalfFov>
<kml_vertHalfFov>"15.000000"</kml_vertHalfFov>
<kml_near>"40.000000"</kml_near>
<kml_height_mode>"map ground level"</kml_height_mode>
<kml_height>"10.000000"</kml_height>
<kml_period>2</kml_period>
<kml_last_ts>0.000000</kml_last_ts>
</camogm_state>
start recording:
camogm_interface.php?cmd=start
stop recording:
camogm_interface.php?cmd=stop
rename file:
camogm_interface.php?cmd=file_rename&file_old=ABC&file_new=XYZ
returns errors if the file names are the same or if the target file name already exists.
mount partition:
mount the default partition /dev/hda1 at /var/hdd. Also create the required directory:
camogm_interface.php?cmd=mount
You can also supply 2 more arguments specifying custom partition and mountpoint:
For example:
camogm_interface.php?cmd=mount&partition=/dev/hdb1&mountpoint=/var/externalhdd
unmount partition:
To unmount a previously mounted partition you need to supply the mountpoint:
For example:
camogm_interface.php?cmd=umount&mountpoint=/var/externalhdd
list devices: Shows xml information about connected media no matter if they are mounted or not:
camogm_interface.php?cmd=listdevices
with only the internal HDD this returns:
<camogm_interface>
<command>listdevices</command>
<listdevices>
<item>
<partition>/dev/hda1</partition>
<size>37.25 GB</size>
<mountpoint>/var/hdd</mountpoint>
<filesystem>ext2</filesystem>
</item>
</listdevices>
</camogm_interface>
create directory: creates a new directory
Example creating a new directory called "newdir" in the /subdir/ which has to exist already:
camogm_interface.php?cmd=mkdir&name=/subdir/newdir
Get remaining free HDD Space:
camogm_interface.php?cmd=get_hdd_space
is HDD mounted:
camogm_interface.php?cmd=get_hdd_space
returns either the mountpoint or "no HDD mounted"
create HDD symlink:
camogm_interface.php?cmd=create_symlink
makes the HDD available over http by placing a symlink in the correct directory.
List files:
camogm_interface.php?cmd=list_files&dir=/
returns an xml tree of the available files at a specified path with details like size and creation date:
<file>
<type>mov</type>
<name>1226615834_588046.mov</name>
<path>1226615834_588046.mov</path>
<size>2545355</size>
<date>13 Nov 2008 22:37:15</date>
</file>
set camogm record directory:
camogm_interface.php?cmd=set_prefix&prefix=XYZ
Tell camogm to record to this specified path. Also creates/sets a cookie called "directory" with the same value.
init the camera compressor:
camogm_interface.php?cmd=init_compressor
check USB audio hardware:
camogm_interface.php?cmd=check_audio_hardware
Returns connected (hotplugable) USB audio devices.
Play sound over USB audio device:
camogm_interface.php?cmd=test_audio_playback&soundfile=XYZ
Tests audio hardware by playing back a specific soundfile.
set quicktime as recording format:
camogm_interface.php?cmd=setmov
Tells camogm to use quicktime mov as format.
