Difference between revisions of "HDR images with Elphel cameras"
OneArtPlease (talk | contribs) |
|||
| (12 intermediate revisions by 4 users not shown) | |||
| Line 1: | Line 1: | ||
| − | The purpose of this project is to get HDR images using an Elphel camera | + | The purpose of this project is to get HDR images using an Elphel camera. |
For informations about HDR imaging see: [http://en.wikipedia.org/wiki/High_dynamic_range_imaging Wikipedia.org]. For informations about HDR imaging algorithms see: [http://www.debevec.org/ Debevec.org] and [http://www1.cs.columbia.edu/CAVE/ Columbia.edu]. | For informations about HDR imaging see: [http://en.wikipedia.org/wiki/High_dynamic_range_imaging Wikipedia.org]. For informations about HDR imaging algorithms see: [http://www.debevec.org/ Debevec.org] and [http://www1.cs.columbia.edu/CAVE/ Columbia.edu]. | ||
| + | There are several ways how to increase the dynamic range and to achieve HDR images: | ||
| − | + | =Exposure Bracketing= | |
| + | ==Autoexposure Daemon HDR Functions== | ||
| + | The autoexposure daemon running in the camera can rapidly alternate between multiple exposure times, allowing a single video stream with over / under exposed sequential frames. In post, these frames can be separated into individual streams and finally combined into a single HDR sequence. | ||
| + | This HDR-video can be recorded just like any other normal video with the harddisk-recorder, camogm or captured over the network. | ||
| − | + | Due to limitations in how fast the exposure time change can be propagated to the image sensor, HDR mode works best in [[Trigger| Triggered]] mode([http://www.mail-archive.com/support-list@support.elphel.com/msg00533.html]); And by altering the http://*CameraIP*/tuneseq.php?mode=latency- page, setting the EXPOS value to "0". ([http://www.mail-archive.com/support-list@support.elphel.com/msg00492.html]). | |
| − | + | Below is a parsedit url that provides quick access to the required parameters for frame sequential HDR in triggered mode: | |
| + | (replace the IP address with that of your camera) | ||
| − | + | http://192.168.0.8/parsedit.php?embed=0.15&title=Parameters+for+groups:+autoexposure+whiteBalance+trigger+&WB_EN&AUTOEXP_ON&TRIG&TRIG_PERIOD&EXPOS&HDR_DUR&HDR_VEXPOS | |
| − | + | [[File:HDRTrigMode.png]] | |
| + | # WB_EN - set to 0 to turn off automatic white balance adjustment | ||
| + | # AUTOEXP_ON - set to 0 to turn off automatic exposure time adjustments | ||
| + | # TRIG - Switch from free-running-mode(default) to triggered mode:TRIG_CONDITION=0x0, set the TRIG_PERIOD, TRIG=0x4 | ||
| + | # TRIG_PERIOD - defines FPS (1/frame period; FPS = 96000000 / TRIG_PERIOD); 3840000 [decimal] for 25FPS) | ||
| + | # EXPOS - Exposure time in µseconds (10000 = 10 ms) Note that in triggered mode not the entire frame period can be used for exposing | ||
| + | # HDR_DUR - 0 = HDR ON, 1 = HDR ON | ||
| + | # HDR_VEXPOS - defines the exposure difference between the 2 alternating exposure times. | ||
| − | |||
| − | + | Also very handy is the "Last aquired images" link on top/bottom of the parsedit table as it shows a table of the last 9 images (total number, number per row can be altered in the URL) and the matching exposure time values. Please be aware though that mismatching parameters will lead to the exposure not alternating with each frame but every second, thirds, etc. frame while the exposure time displayed in the table will seem correct but is actually wrong. | |
| − | + | [[File:Hdr_alternating.jpg]] | |
| + | ==Manual Bracketing== | ||
| + | You can do exposure bracketing manually with a PHP script. Just set exposure time -> capture a single frame -> change exposure time -> capture another image, etc. | ||
| + | This will be slower than using the daemon but you have finer control over how many brackets you want and how big the EV steps between the brackets are, etc. | ||
| + | This is best suited for still image recording where speed is not so much of an issue. | ||
| − | + | =Gain Bracketing= | |
| − | + | [[JP4 HDR]] is a special raw color format that can capture a higher dynamic range in an image without introducing any artifacts as result from combining images captured at different times (exposure bracketing). Though the post processing code to develop the images is still experimental. | |
| − | |||
| − | |||
| − | |||
| − | |||
| − | |||
| − | |||
| − | |||
| − | |||
| − | |||
| − | |||
| − | |||
| − | |||
| − | |||
| − | |||
| − | |||
| − | |||
| − | |||
| − | |||
| − | |||
| − | |||
| − | |||
| − | |||
| − | |||
| − | |||
| − | |||
| − | |||
| − | |||
| − | |||
| − | |||
| − | |||
| − | |||
| − | |||
| − | |||
| − | |||
| − | |||
| − | |||
| − | |||
| − | |||
| − | |||
| − | |||
| − | |||
| − | |||
| − | |||
| − | |||
| − | |||
| − | |||
| − | |||
| − | |||
| − | |||
| − | |||
| − | |||
| − | |||
| − | |||
| − | |||
| − | |||
| − | |||
| − | |||
| − | |||
| − | |||
| − | |||
| − | |||
| − | |||
| − | |||
| − | |||
| − | |||
| − | |||
| − | |||
| − | |||
| − | |||
| − | |||
| − | |||
| − | |||
| − | |||
| − | |||
| − | |||
| − | |||
| − | |||
| − | |||
| − | |||
| − | |||
| − | |||
| − | |||
| − | |||
| − | |||
| − | |||
| − | |||
| − | |||
| − | |||
| − | |||
| − | |||
| − | |||
| − | |||
| − | |||
| − | |||
| − | |||
| − | |||
| − | |||
| − | |||
| − | |||
| − | |||
| − | |||
| − | |||
| − | |||
| − | |||
| − | |||
| − | |||
| − | |||
| − | |||
Latest revision as of 08:18, 23 January 2012
The purpose of this project is to get HDR images using an Elphel camera.
For informations about HDR imaging see: Wikipedia.org. For informations about HDR imaging algorithms see: Debevec.org and Columbia.edu.
There are several ways how to increase the dynamic range and to achieve HDR images:
Contents
Exposure Bracketing
Autoexposure Daemon HDR Functions
The autoexposure daemon running in the camera can rapidly alternate between multiple exposure times, allowing a single video stream with over / under exposed sequential frames. In post, these frames can be separated into individual streams and finally combined into a single HDR sequence. This HDR-video can be recorded just like any other normal video with the harddisk-recorder, camogm or captured over the network.
Due to limitations in how fast the exposure time change can be propagated to the image sensor, HDR mode works best in Triggered mode([1]); And by altering the http://*CameraIP*/tuneseq.php?mode=latency- page, setting the EXPOS value to "0". ([2]).
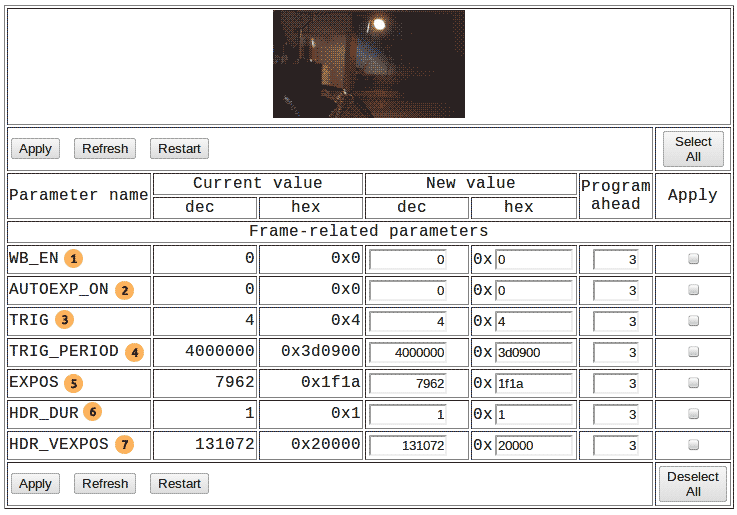
Below is a parsedit url that provides quick access to the required parameters for frame sequential HDR in triggered mode: (replace the IP address with that of your camera)
- WB_EN - set to 0 to turn off automatic white balance adjustment
- AUTOEXP_ON - set to 0 to turn off automatic exposure time adjustments
- TRIG - Switch from free-running-mode(default) to triggered mode:TRIG_CONDITION=0x0, set the TRIG_PERIOD, TRIG=0x4
- TRIG_PERIOD - defines FPS (1/frame period; FPS = 96000000 / TRIG_PERIOD); 3840000 [decimal] for 25FPS)
- EXPOS - Exposure time in µseconds (10000 = 10 ms) Note that in triggered mode not the entire frame period can be used for exposing
- HDR_DUR - 0 = HDR ON, 1 = HDR ON
- HDR_VEXPOS - defines the exposure difference between the 2 alternating exposure times.
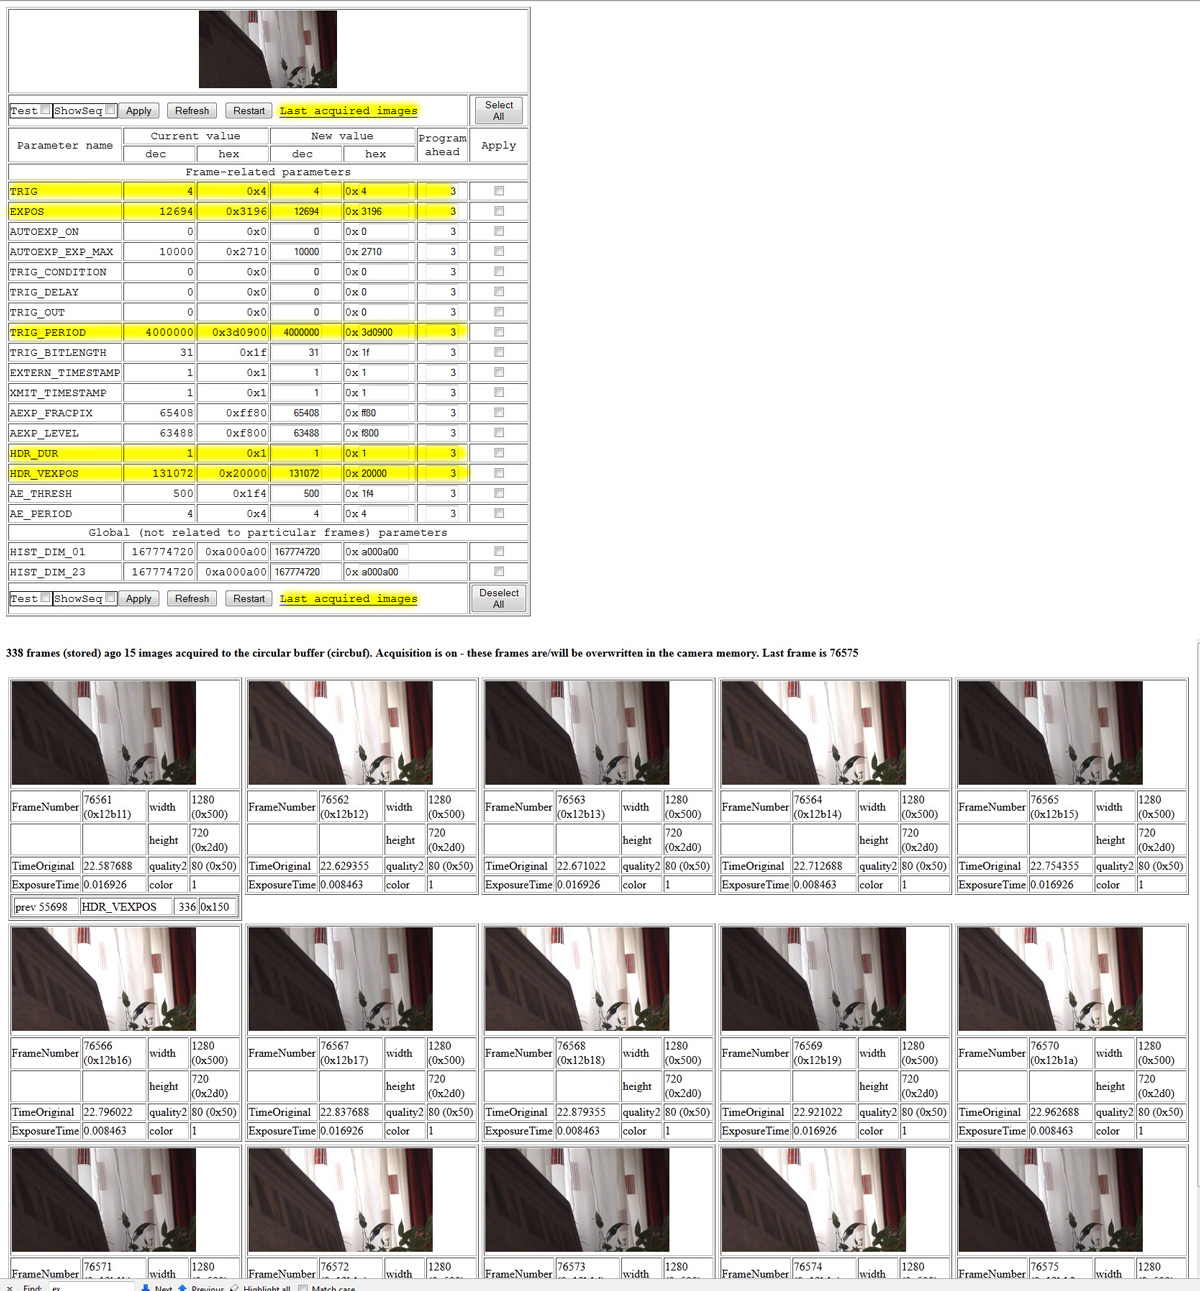
Also very handy is the "Last aquired images" link on top/bottom of the parsedit table as it shows a table of the last 9 images (total number, number per row can be altered in the URL) and the matching exposure time values. Please be aware though that mismatching parameters will lead to the exposure not alternating with each frame but every second, thirds, etc. frame while the exposure time displayed in the table will seem correct but is actually wrong.
Manual Bracketing
You can do exposure bracketing manually with a PHP script. Just set exposure time -> capture a single frame -> change exposure time -> capture another image, etc. This will be slower than using the daemon but you have finer control over how many brackets you want and how big the EV steps between the brackets are, etc. This is best suited for still image recording where speed is not so much of an issue.
Gain Bracketing
JP4 HDR is a special raw color format that can capture a higher dynamic range in an image without introducing any artifacts as result from combining images captured at different times (exposure bracketing). Though the post processing code to develop the images is still experimental.

