Understanding camvc
This Tutorial was written for 7.X Firmware of Elphel cameras. Since 8.0 camvc has a different file structure and parts of the tutorial might be outdated.
Camera communication part is re-written in 8.0 completely, some larger files are split into smaller to simplify maintenance.--Andrey.filippov 14:07, 11 February 2009 (CST)
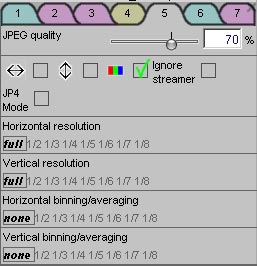
I wanted to add a new checkbox to the camvc interface but had trouble getting a good overview of how this mainly AJAX driven tool that spreads sources over multiple files really works.
This tutorial is the result of my search and should help people that also want to add new features to understand the filestructure and functionality of camvc.
There already is a newer version of camvc called camvc2 that works slightly different and is not 100% complete yet. This tutorial applies to both versions as underlying layout is basically the same.
The Files
camvc.html is the main file and contains all variables as well as the html code defining the layout.
camvc_i18n.js contains the labels and help texts in multiple languages (currently: English, Russian and Chinese)
camvc_ccam.js contains the acutal AJAX components that set/get parameters to/from the camera
Adding JP4 Checkbox
So now we want to add a new feature to camvc: JP4 encoding mode right below the checkbox for color/monocrome, ignore streamer
Open camvc.html and scroll down to a block where a lot of variables are set. All variables are set in javascript as member of the document class:
I added the jp4 line just below playbackUpdated variable at line 274:
document.playbackUpdated=0;
document.jp4_mode=false;
Now we add the actual html code to display the new checkbox just after the checkbox to ignore the streamer:
<div id="idIgnoreStreamer_ALL" style="float:left;">
 <div id="idIgnoreStreamer_LB" class="float_icon"></div>
 <div id="idIgnoreStreamer_CB" class="float_icon"></div>
</div>
<br/> // ADDED
<div id="idJP4_ALL" style="float:left;"> // ADDED
 <div id="idJP4_LB" class="float_icon"></div> // ADDED
 <div id="idJP4_CB" class="float_icon"></div> // ADDED
</div> // ADDED
The id _ALL is the help text displayed when you hover over the checkbox in the ?-Help Mode.
The _LB id stands for label and is the actual text to display in the corresponding language
The _CB id stands for checkbox
We now open camvc_i18n.js to set the label and help text:
Add the following where you think it fits best (I added it below the definitions for IngoreStreamer)
{id:"idJP4_LB", t:"p",en:"JP4<br/> Mode",
cn:"JP4<br/> Mode",
ru:"JP4<br/> Mode"},
{id:"idJP4_ALL",t:"h",en:"Enable JP4 encoding mode for demosaicing images on client side",
cn:"Please translate: Enable JP4 encoding mode for demosaicing on client side",
ru:"Please translate: Enable JP4 encoding mode for demosaicing on client side"},
Now we need to deal with the actual function so go back to camvc.html:
Add the following definition for our checkbox to the document.buTtons Array (I added it at line 600)
{id:"idJP4_CB", n:30, t:"T2",dm:"", aop:"JP4Clicked();updateColor();"},
and the actual funtion to the list of funtions (line 2385 for me)
function JP4Clicked() {
 document.jp4_mode=!document.jp4_mode;
}
If you want you can already test the changes by adding an alert to the JP4Clicked() function:
 function JP4Clicked() {
 document.jp4_mode=!document.jp4_mode;
 alert("JP4 Checkbox clicked");
}
We are almost done.
Now we need to get camvc to actually set the camera to use jp4 mode.
So we open camvc_ccam.js and replace the getCommonURL() function with the function below:
function getCommonURL() {
  var common_url= document.cgi+"opt="+document.commonOptions;
  if (document.jp4_mode) common_url+="j";
  else if (document.Color)  common_url+="c";
  if (!document.flipX) common_url+="x";
  if (!document.flipY) common_url+="y";
  return common_url;
}
Done!
