Difference between revisions of "10393 manual"
From ElphelWiki
| Line 13: | Line 13: | ||
* Connect to LAN using the network cable | * Connect to LAN using the network cable | ||
| − | + | ====Notes==== | |
| + | * Boot time: ~40s | ||
| + | * The default boot is from the on-board NAND flash. [[Boot_options_393|More information]] on available boot options and recovery boot. | ||
==<font color="blue">Connections</font>== | ==<font color="blue">Connections</font>== | ||
| Line 46: | Line 48: | ||
* /etc/elphel393/init_elphel393.py | * /etc/elphel393/init_elphel393.py | ||
| − | |||
| − | |||
| − | |||
| − | |||
| − | |||
| − | |||
| − | |||
| − | |||
| − | |||
| − | |||
| − | |||
| − | |||
| − | |||
| − | |||
| − | |||
| − | |||
| − | |||
| − | |||
| − | |||
==<font color="blue">Command line access</font>== | ==<font color="blue">Command line access</font>== | ||
Revision as of 19:12, 15 December 2016
Contents
In the package
- 10393 system
- Power supply wall adapter (48V)
- CAT6 network cable
- μUSB-to-USB cable
- Recovery μSD card
Power on
- Plug in the power supply
- Connect to LAN using the network cable
Notes
- Boot time: ~40s
- The default boot is from the on-board NAND flash. More information on available boot options and recovery boot.
Connections
- Connect sensors to system board - FPC cables are not symmetrical
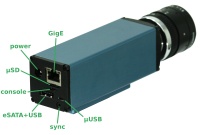
- Ports:
Important Notes
- As of 2016/12/15, the software supports only 5MPix sensors, for 14MPix, please see:
Defaults
| IP Address | 192.168.0.9 |
|---|---|
| User | root |
| Password | pass |
- The IP address is set in the /etc/elphel393/init_elphel393.py in the currenly mounted rootfs ("/").
init_elphel393.py
- /etc/elphel393/init_elphel393.py
Command line access
ssh root@192.168.0.9
Serial console access
- Use a microUSB-USB cable to connect to PC - the cable's end should be thin enough otherwise interferes with the micro SD card.
- Linux: minicom -c on
- likely device: /dev/ttyUSB0
- settings: 115200 8N1, no for hardware/software flow control
Get images
channel 1: http://192.168.0.9:2323/img
channel 2: http://192.168.0.9:2324/img
channel 3: http://192.168.0.9:2325/img
channel 4: http://192.168.0.9:2326/img
Video
Display
Multipart JPEG stream
http://192.168.0.9:2323/mimg
http://192.168.0.9:2324/mimg
http://192.168.0.9:2325/mimg
http://192.168.0.9:2326/mimg
GStreamer
gst-launch-1.0 souphttpsrc is-live=true location=http://192.168.0.9:2323/mimg ! jpegdec ! xvimagesink
- Only mjpeg, no rtsp yet.
- More examples at Using GStreamer
Record
- More info
- If the prefix parameter, which is absolute path + prefix, for a channel is not set the file will be written somewhere to rootfs (likely /usr/local/verilog/)
browser
Example 1: (provide a correct media mount point)
Example 2:
- channel 0, /dev/sda1, w/o a file name prefix
- setup:
http://192.168.0.9/camogm.php?chn=0&cmd=prefix=/mnt/sda1/;
- start:
http://192.168.0.9/camogm.php?chn=0&cmd=start;
- stop:
http://192.168.0.9/camogm.php?chn=0&cmd=stop;
command line
Example:
- channel 2, /home/root, file prefix=test_, 1GB or 10min files whichever occurs first
- setup and start (in one line):
echo "format=mov;status=/var/tmp/camogm2.status;prefix=/home/root/test_;duration=600;length=1073741824;start" > /var/volatile/camogm_cmd2
- stop recording:
echo "stop" > /var/volatile/camogm_cmd2
sync
Change parameters
- http://192.168.0.9/controls.html - previews and basic parameters:
- Exposure - the values are in the sensor lines. Currently conversion to seconds is not correct.
- WB - r,g,b gains
- Quality - compression quality - individual for compressor but common for the buffer driver - it's better to have the same value for all channels.
- For 5MPix the startup settings are defined int the /usr/local/verilog/startup5 on the micro SD card, FAT32 partition:
...
-c write_sensor_i2c  all 1 0 0x9009001e (exposure)
-c write_sensor_i2c  all 1 0 0x9035000a (set all gains to 0xa)
-c write_sensor_i2c  all 1 0 0x902c000e (blue gain to 0xe)
-c write_sensor_i2c  all 1 0 0x9009001d (red gain to 0xd)
...
Temperature monitor
- http://192.168.0.9/hwmon.html:
- Tshutdown - automatic shutdown temperature level
Proper shutdown
- if not properly shutdown - μSD might get corrupted (run sync at least)
shutdown -hP now
Firmware image
- 20160804 (new)
- root/pass
- overlayfs enabled if rootfs is on flash - lower: /tmp/rootfs.ro, upper: /tmp/rootfs.rw - changes to the filesystem are made on:
reboot -f
or
shutdown -hP now
or (most likely will work but correct work is not guaranteed)
overlay_sync
- 20160626 (old)
- python scripts moved to /tmp - dependencies create pycs
- init_elphel393.sh moved from μSD card to /etc in rootfs - boot from flash doesn't require an inserted card for fixed boards.
- default IP address changed to 192.168.0.9 as in the image built from our repositories.
- 20160622 (old)
- 20160614 (old)
- 20160607 (old)
- 20160601 (old)
- 20160526 (old)
- 20160524 (old)
- 20160519 (old)
Known problems
- [solved] Vertical artifacts in jpegs. Images are ok at 100% quality. Fixed, testing.
- http://192.168.0.9:232x/noexif/mimg - multipart jpeg displays corrupted frames from time to time. Reason: network bandwidth?
- [solved] Sometimes on power-on (NAND flash boot) cannot mount the card's rootfs partition. Kernel Panics. Power off/on. Soft "reboot -f" works ok.
...
Kernel panic - not syncing: VFS: Unable to mount root fs on unknown-block(179,2)
...
- Changing exposure/quality/gains - can corrupt images - needs testing.
- After rewriting rootfs to μSD card - some of the cards get a corrupted partition - re-partitioning (reformatting?) solves the problem.
On the camera the rootfs is mounted as RW and some of the files are changed (also links created) -
most of the changes are now moved to tmpfs but something might have been missed.
Notes
- In case rootfs is on flash, it might make sense (or maybe not as the history is updated only once on session exit) to disable bash sessions command history - disable bash history


