Difference between revisions of "10393 power"
From ElphelWiki
(→Options) |
|||
| (19 intermediate revisions by 2 users not shown) | |||
| Line 1: | Line 1: | ||
| − | [[File:10393 power j3 j4.jpeg|thumb|350px|Fig. | + | [[File:10393 boards 10385.png|thumb|350px|Fig.1 power through J3 connector]] |
| − | [[File:10393 power j4.jpeg|thumb|400px|Fig. | + | [[File:10393 power j3 j4.jpeg|thumb|350px|Fig.2 power through J3 connector]] |
| + | [[File:10393 power j4.jpeg|thumb|400px|Fig.3 power through J4 connector]] | ||
| + | |||
| + | ==Options== | ||
| + | {| class='wikitable' | ||
| + | !Range | ||
| + | !Power supply | ||
| + | !Power board | ||
| + | |- | ||
| + | |align='left'|'''36-72V''' (default) | ||
| + | | wall adapter (48V) | ||
| + | | 10386 | ||
| + | |- | ||
| + | |align='left'|'''18-75V''' | ||
| + | | wall adapter (48V) | ||
| + | | 10385 | ||
| + | |- | ||
| + | |align='left'|'''12-36V''' | ||
| + | | wall adapter, battery (12V) | ||
| + | | 10385 | ||
| + | |- | ||
| + | |align='left'|'''3.3V''' | ||
| + | | direct, custom | ||
| + | | None | ||
| + | |} | ||
==18-75V (48V)== | ==18-75V (48V)== | ||
* camera's DC-DC converter installed: TRACO POWER THD 12-4810WI, IN 18-75V, OUT 3.3V/3500mA | * camera's DC-DC converter installed: TRACO POWER THD 12-4810WI, IN 18-75V, OUT 3.3V/3500mA | ||
===Notes=== | ===Notes=== | ||
| − | * For 48V the recommended connector is '''J3''' | + | * For 48V the recommended connector is '''J3''' (accessible from the back panel) |
==9-36V (12V)== | ==9-36V (12V)== | ||
| Line 11: | Line 35: | ||
===Notes=== | ===Notes=== | ||
| − | * <font color='red'>For 12V the recommended connector is '''J4''' - bypassing diodes reduces voltage drop and the chances of not hitting the lower voltage limit are | + | * <font color='red'>For 12V the recommended connector is '''J4''' - bypassing diodes reduces voltage drop and the chances of not hitting the lower voltage limit are higher.</font> |
| − | * For | + | * For 18+ V the recommended connector is '''J3''' |
==Power supply requirements== | ==Power supply requirements== | ||
| + | AC/DC WALL MOUNT ADAPTER | ||
* 20+ W | * 20+ W | ||
** 48V => 0.42+ A | ** 48V => 0.42+ A | ||
** 12V => 1.67+ A | ** 12V => 1.67+ A | ||
| + | |||
| + | ==3.3V== | ||
| + | * Without power board | ||
| + | {| | ||
| + | |valign='top'|[[File:10393 power33 1.jpeg|thumb|320px|Fig.4 10393 (J1) and cable, see [[10393|schematics]]]] | ||
| + | |valign='top'|[[File:10393 power33 2b.jpeg|thumb|320px|Fig.5 Any side can be used]] | ||
| + | |valign='top'|[[File:10393 power33 3.jpeg|thumb|320px|Fig.6 Power supply]] | ||
| + | |} | ||
| + | |||
| + | ==Powering from batteries== | ||
| + | ===12V setup=== | ||
| + | Power from any battery with output voltage ranging 12-36V. | ||
| + | |||
| + | ===48V setup=== | ||
| + | Power from any battery with output voltage ranging 18-75V. | ||
| + | |||
| + | ===Example setup and cables for 48V=== | ||
| + | * ANTY BATTERY 48V 4A (ANTY or BOOANT, can be found on AliExpress). Enough to power a single camera for several hours. See Fig.7. | ||
| + | * Power cable with an inline fuse and a switch, battery connector came with the battery, the outputs are 2.1mm plugs. Is used to power the camera. See Fig.8. | ||
| + | * Cable with a 48-to-12v converter ([https://www.digikey.com/product-detail/en/cui-inc/PYB20-Q48-S12-DIN/102-3224-ND/4477482 CUI INC PYB15-Q48-S12]). It was used to power an extra network switch which might not be needed. See Fig.9. | ||
| + | * The camera was connected to a laptop running on its own battery. | ||
| + | |||
| + | <gallery widths=300 heights=200 mode=nolines> <!-- caption="Setting up external tool"--> | ||
| + | File:10393 battery48v 1.jpeg| Fig.7 Battery | ||
| + | File:10393 battery48v power cable.jpeg| Fig.8 Power cable | ||
| + | File:10393 battery48v 48-to-12v converter.jpeg| Fig.9 48-to-12v DC DC converter cable | ||
| + | File:10393 battery48v 2.jpeg| Fig.10 48V power setup | ||
| + | File:10393 battery48v all connected.jpeg| Fig.11 48V and extra 12V for something else | ||
| + | </gallery> | ||
| + | |||
| + | |||
| + | [[Category:393]] | ||
Latest revision as of 09:58, 4 September 2018
Contents
Options
| Range | Power supply | Power board |
|---|---|---|
| 36-72V (default) | wall adapter (48V) | 10386 |
| 18-75V | wall adapter (48V) | 10385 |
| 12-36V | wall adapter, battery (12V) | 10385 |
| 3.3V | direct, custom | None |
18-75V (48V)
- camera's DC-DC converter installed: TRACO POWER THD 12-4810WI, IN 18-75V, OUT 3.3V/3500mA
Notes
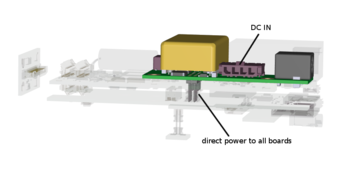
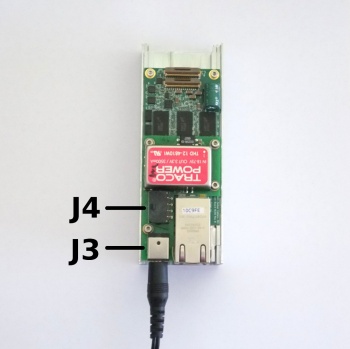
- For 48V the recommended connector is J3 (accessible from the back panel)
9-36V (12V)
- camera's DC-DC converter installed: TRACO POWER THD 12-2410WI, IN 9-36V, OUT 3.3V/3500mA
Notes
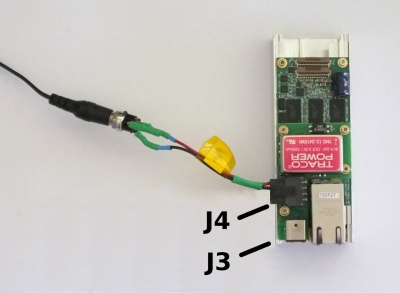
- For 12V the recommended connector is J4 - bypassing diodes reduces voltage drop and the chances of not hitting the lower voltage limit are higher.
- For 18+ V the recommended connector is J3
Power supply requirements
AC/DC WALL MOUNT ADAPTER
- 20+ W
- 48V => 0.42+ A
- 12V => 1.67+ A
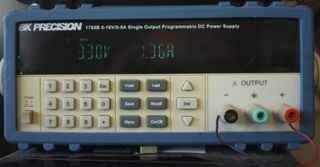
3.3V
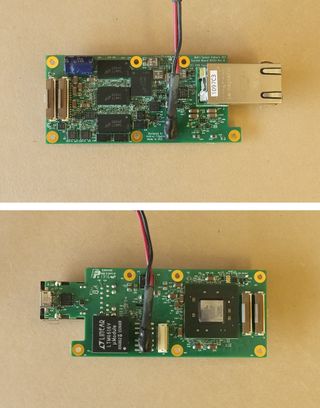
- Without power board
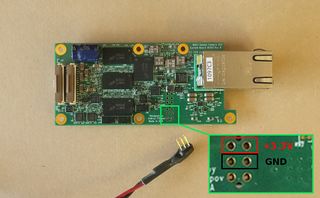 Fig.4 10393 (J1) and cable, see schematics |
Powering from batteries
12V setup
Power from any battery with output voltage ranging 12-36V.
48V setup
Power from any battery with output voltage ranging 18-75V.
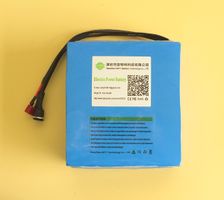
Example setup and cables for 48V
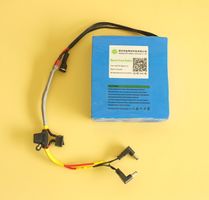
- ANTY BATTERY 48V 4A (ANTY or BOOANT, can be found on AliExpress). Enough to power a single camera for several hours. See Fig.7.
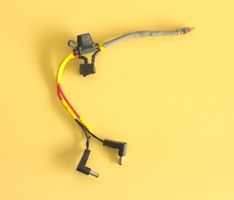
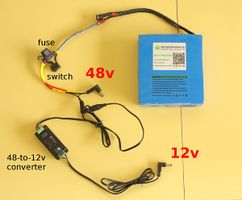
- Power cable with an inline fuse and a switch, battery connector came with the battery, the outputs are 2.1mm plugs. Is used to power the camera. See Fig.8.
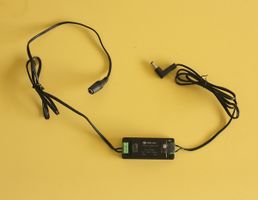
- Cable with a 48-to-12v converter (CUI INC PYB15-Q48-S12). It was used to power an extra network switch which might not be needed. See Fig.9.
- The camera was connected to a laptop running on its own battery.
