Difference between revisions of "Arduino"
(→Modify the kernel config) |
|||
| Line 18: | Line 18: | ||
===Modify the kernel config=== | ===Modify the kernel config=== | ||
| − | + | go to the source directory for example ~/elphel_projects/elphel353-8.0.8.29/elphel353 | |
| − | sed s/"# CONFIG_USB_SERIAL_FTDI_SIO is not set"/"CONFIG_USB_SERIAL_FTDI_SIO=y"/g | + | sed s/"# CONFIG_USB_SERIAL_FTDI_SIO is not set"/"CONFIG_USB_SERIAL_FTDI_SIO=y"/g os/linux-2.6/.config > os/linux-2.6/.config__ |
| − | + | mv os/linux-2.6/.config__ os/linux-2.6/.config | |
| − | mv | ||
Creating /dev/ttyUSB0 is not necessary, it was already done for compass and GPS modules, but if you need to add some /dev file, it can be done in ~/elphel353-8.0.4.3/elphel353/packages/devices/elphel/Makefile . | Creating /dev/ttyUSB0 is not necessary, it was already done for compass and GPS modules, but if you need to add some /dev file, it can be done in ~/elphel353-8.0.4.3/elphel353/packages/devices/elphel/Makefile . | ||
Revision as of 02:41, 28 June 2010
Contents
Preamble
Arduino is an open-source electronics prototyping platform based on flexible, easy-to-use hardware and software.
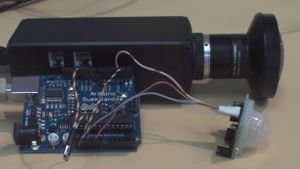
Here is a simple example of how to use Arduino with Elphel cameras. I connected a PIR (Passive Infrared motion sensor) and a button to my Arduino. Motion detection will trigger recording on CF for a minute and the button will store a full resolution snapshot on CF.
As motion detection or button pressure is detected on Arduino it send a _shell command_ to the camera over usb-serial connection. So it is easy to automate everything the camera can do.
On the camera I only enabled FTDI driver in the kernel and run microcom to send output to the shell:
microcom -s 9600 /dev/ttyUSB0 | sh
Configuring your camera firmware
Getting the SDK
Please refer to Elphel Software Kit for Ubuntu for SDK installation
Modify the kernel config
go to the source directory for example ~/elphel_projects/elphel353-8.0.8.29/elphel353
sed s/"# CONFIG_USB_SERIAL_FTDI_SIO is not set"/"CONFIG_USB_SERIAL_FTDI_SIO=y"/g os/linux-2.6/.config > os/linux-2.6/.config__
mv os/linux-2.6/.config__ os/linux-2.6/.config
Creating /dev/ttyUSB0 is not necessary, it was already done for compass and GPS modules, but if you need to add some /dev file, it can be done in ~/elphel353-8.0.4.3/elphel353/packages/devices/elphel/Makefile .
Build the firmmware
Just:
cd ~/elphel353-8.0.4.3/elphel353
make
Arduino source code
//the time we give the sensor to calibrate (10-60 secs according to the datasheet)
int calibrationTime = 10;
//the time when the sensor outputs a low impulse
long unsigned int lowIn;
//the amount of milliseconds the sensor has to be low
//before we assume all motion has stopped
long unsigned int pause = 60000;
boolean lockLow = true;
boolean takeLowTime;
int pirPin = 3;    //the digital pin connected to the PIR sensor's output
int ledPin = 13;
int inPin = 2;   // choose the input pin (for a pushbutton)
int val = 0;     // variable for reading the pin status
bool pushed = false;
//
void setup(){
 Serial.begin(9600);
 pinMode(pirPin, INPUT);
 pinMode(inPin, INPUT);    // declare pushbutton as input
 pinMode(ledPin, OUTPUT);
 digitalWrite(pirPin, LOW);
 delay(50);
 //give the sensor some time to calibrate
 Serial.print("#calibrating sensor ");
   for(int i = 0; i < calibrationTime; i++){
     Serial.print(".");
     delay(1000);
     }
   Serial.println("# done");
   Serial.println("#SENSOR ACTIVE");
   delay(50);
 }
//
void loop(){
    if(digitalRead(pirPin) == HIGH){
      digitalWrite(ledPin, HIGH);   //the led visualizes the sensors output pin state
      if(lockLow){
        //makes sure we wait for a transition to LOW before any further output is made:
        lockLow = false;
        Serial.println("echo 'status; start; status=/var/tmp/camogm.status' > /var/state/camogm_cmd");
        delay(50);
        }
        takeLowTime = true;
       }
    if(digitalRead(pirPin) == LOW){
      digitalWrite(ledPin, LOW);  //the led visualizes the sensors output pin state
      if(takeLowTime){
       lowIn = millis();          //save the time of the transition from high to LOW
       takeLowTime = false;       //make sure this is only done at the start of a LOW phase
       }
      //if the sensor is low for more than the given pause,
      //we assume that no more motion is going to happen
      if(!lockLow && millis() - lowIn > pause){
          //makes sure this block of code is only executed again after
          //a new motion sequence has been detected
          lockLow = true;
          Serial.println("echo 'status; stop; status=/var/tmp/camogm.status' > /var/state/camogm_cmd");      //output
          delay(50);
          }
      }
 // button handler
 val = digitalRead(inPin);  // read input value
 if (val == HIGH) {         // check if the input is HIGH (button released)
   if(pushed) {
     pushed = false;
   }
 } else {
   if(!pushed) {
     pushed = true;
     Serial.println("wget http://127.0.0.1/snapfull.php -O /var/hdd/snapfull`date +%s`.jpg");
   }
 }
 }
On the camera
Now that your camera have support for FTDI driver you can plug the Arduino and execute on the camera:
microcom -s 9600 /dev/ttyUSB0 | sh
This can be also done at boot from /etc/inittab or /etc/launcher.conf.xml

