Difference between revisions of "Eyesis4Pi data structure"
| Line 77: | Line 77: | ||
===Post-Processing=== | ===Post-Processing=== | ||
====Requirements==== | ====Requirements==== | ||
| − | * [http://rsbweb.nih.gov/ij/download.html ImageJ] | + | * [http://rsbweb.nih.gov/ij/download.html ImageJ]. |
| − | * [[Elphel_Software_Kit_for_Ubuntu#ImageJ_and_Elphel_plugins_for_imageJ|Elphel ImageJ Plugins]] | + | * [[Elphel_Software_Kit_for_Ubuntu#ImageJ_and_Elphel_plugins_for_imageJ|Elphel ImageJ Plugins]]. |
| − | * | + | * [http://hugin.sourceforge.net/ Hugin tools] - enblend. |
| + | * Download calibration kernels for the current Eyesis4Pi. Example kernels and sensor files can be found [http://community.elphel.com/files/eyesis4pi/imagej/ here]('''~35GB'''). | ||
| + | * Download default.corr-xml from the same [http://community.elphel.com/files/eyesis4pi/imagej/ location]. | ||
| − | ''' | + | ====Instructions(subject to changes soon)==== |
| + | * Launch ImageJ -> Plugins -> Compile & Run. Find and select '''EyesisCorrections.java'''. | ||
| + | {| | ||
| + | |- valign="top" | ||
| + | |[[File:Eyesis_corrections_plugin.jpeg|thumb|800px|Eyesis corrections plugin interface]] | ||
| + | |} | ||
| + | * '''Restore''' button -> browse for default.corr-xml. | ||
| + | * '''Configure correction''' button - make sure that the following paths are set correctly: | ||
| + | <font size='2'> | ||
| + | '''Source files directory''' - directory with the footage images | ||
| + | '''Sensor calibration directory''' - [YOUR-PATH]/sensor_calibration_files | ||
| + | '''Aberration kernels (sharp) directory''' - [YOUR-PATH]/kernels/sharp | ||
| + | '''Aberration kernels (smooth) directory''' - [YOUR-PATH]/kernels/smooth | ||
| + | '''Equirectangular maps directory(may be empty)''' - [YOUR-PATH]/kernels/eqr (it should be created automatically if the w/r rights of [YOUR-PATH]/kernels allow) | ||
| + | </font> | ||
| + | * '''Configure warping''' -> rebuild map files - this will create maps in [YOUR-PATH]/kernels/eqr. Will take ~5-10 minutes. | ||
| + | * '''Select source files''' -> select all the footage files to be processed. | ||
| + | * '''Process files''' to start the processing. Depending on the PC power can take ~30 minutes for a panorama of 19 images. | ||
| + | * After processing is done there is only the blending step - use '''enblend''' from the command line (''cd'' to the directory with the results), example: | ||
| + | <font size='1'> | ||
| + | enblend -l 10 --no-optimize --fine-mask -a -v -w -o result.tif 1334546768_780764-*_EQR.tiff 1334546768_780764-*_EQR-*.tiff | ||
| + | </font> | ||
===Previewer=== | ===Previewer=== | ||
Revision as of 16:29, 27 April 2012
Contents
Intro
Eyesis4Pi stores images and gps/imu logs independently.
| Data | Stored on | Comments |
|---|---|---|
| Images | Host PC or (9x) internal SSDs (if equipped) | |
| IMU/GPS logs | Internal Compact Flash cards (2x16GB) |
IMU/GPS logs
Description
A sensor's log is a list of registered events from various sources:
- Trigger for starting image exposure (fps)
- IMU sentence received (2460 samples per second)
- GPS sentence received (5 samples per second) - in NMEA or other configured format.
Logs are stored in a binary format to have smaller size. Also, there's a file size limit - when it's reached a new file with an auto-incremented index will be started.
Raw logs examples
All the raw *.log files are found here
Parsed log example
parsed_log_example.txt (41.3MB) at the same location
[localTimeStamp,usec]: IMU: [gyroX] [gyroY] [gyroZ] [angleX] [angleY] [angleZ] [accelX] [accelY] [accelZ] [veloX] [veloY] [veloZ] [temperature]

[localTimeStamp,usec]: GPS: $GPRMC,231112.8,A,4043.36963,N,11155.90617,W,000.00,089.0,250811,013.2,E

[localTimeStamp,usec]: SRC: [masterTimeStamp,usec]=>1314335482848366 [localTimeStamp,usec]=>1314335474855775
Tools for parsing logs
Download one of the raw logs.
- PHP: Download read_imu_log.php_txt, rename it to *.php and run on a PC with PHP installed.
- Java: Download IMUDataProcessing project for Eclipse.
Images
Samples
Description
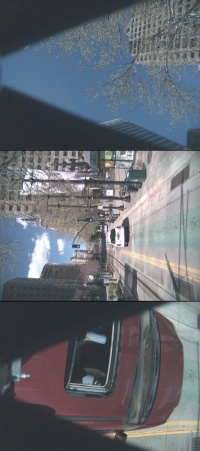
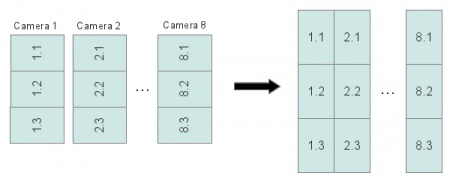
The pictures from each image sensor are stored in 8 triplets (because 3 sensors are connected to a single system board for the 24-sensor equipped camera) in the RAW JP4 format.
 JP4 file opened as JPEG - sample from the master camera. Download original JP4 Open in an online EXIF reader |
File names
Image filename is a timestamp of when it was taken plus the index of the camera (seconds_microseconds_index.jp4):
1334548426_780764_1.jp4
1334548426_780764_2.jp4
...
1334548426_780764_8.jp4
EXIF headers
The JP4 images from the 1st (master) camera have a standard EXIF header which contains all the image taking related information and is geotagged. So the GPS coordinates are present in both the GPS/IMU log and the EXIF header of the 1st camera images. Images from other cameras are not geotagged.
- Open the image from the master camera in an online EXIF viewer.
- Open the image from the secondary camera in an online EXIF viewer.
- The coordinates can be extracted from the images with a PHP script and a map KML file can be created.
Post-Processing
Requirements
- ImageJ.
- Elphel ImageJ Plugins.
- Hugin tools - enblend.
- Download calibration kernels for the current Eyesis4Pi. Example kernels and sensor files can be found here(~35GB).
- Download default.corr-xml from the same location.
Instructions(subject to changes soon)
- Launch ImageJ -> Plugins -> Compile & Run. Find and select EyesisCorrections.java.
- Restore button -> browse for default.corr-xml.
- Configure correction button - make sure that the following paths are set correctly:
Source files directory                - directory with the footage images
Sensor calibration directory          - [YOUR-PATH]/sensor_calibration_files
Aberration kernels (sharp) directory  - [YOUR-PATH]/kernels/sharp
Aberration kernels (smooth) directory - [YOUR-PATH]/kernels/smooth
Equirectangular maps directory(may be empty) - [YOUR-PATH]/kernels/eqr (it should be created automatically if the w/r rights of [YOUR-PATH]/kernels allow)
- Configure warping -> rebuild map files - this will create maps in [YOUR-PATH]/kernels/eqr. Will take ~5-10 minutes.
- Select source files -> select all the footage files to be processed.
- Process files to start the processing. Depending on the PC power can take ~30 minutes for a panorama of 19 images.
- After processing is done there is only the blending step - use enblend from the command line (cd to the directory with the results), example:
enblend -l 10 --no-optimize --fine-mask -a -v -w -o result.tif 1334546768_780764-*_EQR.tiff 1334546768_780764-*_EQR-*.tiff
Previewer
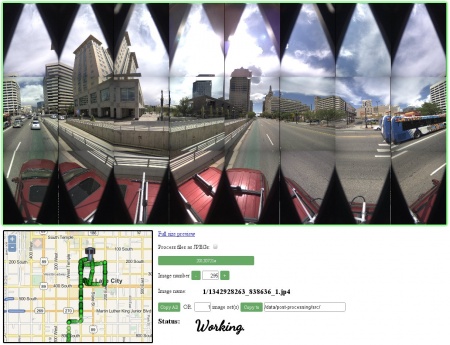
Here's an example of previewing the footage (works better in Firefox). Requires these tools to be installed.
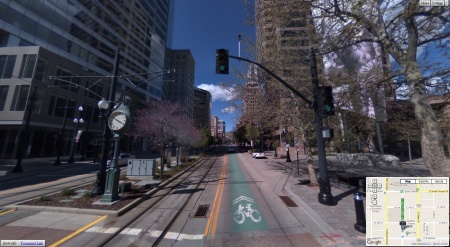
Stitched panoramas Editor/Viewer
Sample route in WebGL Pano Editor/Viewer.
