Difference between revisions of "Eyesis4Pi User Guide - Recording"
From ElphelWiki
(→Links) |
m (→Power On) |
||
| (17 intermediate revisions by the same user not shown) | |||
| Line 1: | Line 1: | ||
| − | == | + | == Download == |
| − | + | <font size='2'> | |
| − | + | The GUI for recording is installed on the Eyesisbox PC by default. | |
| − | |||
| − | < | ||
| − | |||
| − | |||
| − | * Turn the switch on. | + | There are several ways to install a newer version: |
| − | * Connect the camera's ethernet cables to the | + | |
| − | + | Terminal: | |
| − | + | cd <any-path> | |
| − | + | git clone git://elphel.git.sourceforge.net/gitroot/elphel/eyesis4pi_gui (initial checkout) | |
| − | + | git pull (update) | |
| − | <br> | + | SF.net: |
| − | <br> | + | http://elphel.git.sourceforge.net/git/gitweb.cgi?p=elphel/eyesis4pi_gui;a=tree |
| − | ==Network Set Up== | + | </font> |
| − | * Connect the PC to the Gigabit port of the switch. | + | |
| − | * Configure the PC's network settings ([http://linuxlibrary.org/kubuntu-network-configuration/ Kubuntu Network Configuration Guide]): | + | Follow the instructions in INSTALL.txt: |
| − | <font size=2> | + | 1. Install the following packages, terminal: |
| + | sudo apt-get install php5 apache2 | ||
| + | |||
| + | 2. Make the src folder visible to the web server: | ||
| + | 2a. Create a link, terminal: "sudo ln -sf <path-to-eyesis4pi_gui-folder> /var/www/eysisgui" | ||
| + | 2b. Or copy all the files to /var/www/eyesisgui. | ||
| + | Note: "/var/www" is the (apache2) web server's document root folder. | ||
| + | |||
| + | 3. Make the footage root folder "/data/footage" writable for everyone. | ||
| + | |||
| + | |||
| + | == Equipment/Package == | ||
| + | |||
| + | *Eyesis4Pi | ||
| + | *Switch | ||
| + | *PC / Laptop | ||
| + | |||
| + | <br> <br> | ||
| + | |||
| + | == Power On == | ||
| + | |||
| + | *Turn the switch on. | ||
| + | *Connect the camera's ethernet cables to the power enabled ports. The camera boot takes about 1 min. | ||
| + | <font size='2'><b> | ||
| + | Important Notice: Use a fan to cool the camera's pole when shooting indoors. | ||
| + | </b></font> | ||
| + | <br> <br> | ||
| + | |||
| + | == Network Set Up == | ||
| + | |||
| + | *Connect the PC to the Gigabit port of the switch. | ||
| + | *Configure the PC's network settings ([http://linuxlibrary.org/kubuntu-network-configuration/ Kubuntu Network Configuration Guide]): | ||
| + | |||
| + | <font size="2"></font> | ||
| + | |||
| + | <font size="2"> | ||
IP address: 192.168.0.68 (example) | IP address: 192.168.0.68 (example) | ||
Mask: 255.255.255.0 | Mask: 255.255.255.0 | ||
</font> | </font> | ||
| − | '''''Note:''' Eyesis4Pi's default IP addresses: 192.168.0.221-229'' | + | |
| − | <br> | + | <font size="2"></font> '''''Note:''' Eyesis4Pi's default IP addresses: 192.168.0.221-229'' <br> <br> |
| − | <br> | + | |
| − | ==System Tests== | + | == System Tests == |
| − | * Open the GUI page (the address is bookmarked in the Firefox and in the Chrome). The GUI address is: | + | |
| − | <font size=2> | + | *Open the GUI page (the address is bookmarked in the Firefox and in the Chrome). The GUI address is: |
| + | |||
| + | <font size="2"></font> | ||
| + | |||
| + | <font size="2"> | ||
http://127.0.0.1/eyesisgui/index.html | http://127.0.0.1/eyesisgui/index.html | ||
</font> | </font> | ||
| + | |||
| + | <font size="2"></font> | ||
| + | |||
{| | {| | ||
|- valign="top" | |- valign="top" | ||
| − | |[[ | + | | [[Image:Recording gui settings.jpeg|thumb|500px]] |
|} | |} | ||
| − | * Go to the "Settings" - | + | *Go to the "Settings" -> "Test"-tab: |
| − | * Follow the '''Open the test page'''-link, the tests are: | + | *Follow the '''Open the test page'''-link, the tests are: |
| − | <font size= | + | |
| + | <font size="2"></font> | ||
| + | |||
| + | <font size="2"> | ||
1. All the modules are online. | 1. All the modules are online. | ||
2. GPS locked | 2. GPS locked | ||
| Line 44: | Line 85: | ||
4. Internal CF cards are present | 4. Internal CF cards are present | ||
</font> | </font> | ||
| − | <!-- | + | |
| + | <font size="2"></font> <!-- | ||
{| | {| | ||
|- | |- | ||
| Line 61: | Line 103: | ||
|[[File:Cf cards.jpeg|thumb|Fig.5 CF cards]] | |[[File:Cf cards.jpeg|thumb|Fig.5 CF cards]] | ||
|} | |} | ||
| − | --> | + | --> <br> <br> |
| − | <br> | + | |
| − | <br> | + | == Setting recording parameters: storage paths == |
| + | |||
| + | *Check paths at the '''Settings''' -> '''Recording'''-tab | ||
| − | = | + | <font size="2"></font> |
| − | + | <font size="2"> | |
| − | <font size= | ||
'''Absolute footage path''' - the path to the folder where all the footage series are stored. '''Must be writable to everyone.''' | '''Absolute footage path''' - the path to the folder where all the footage series are stored. '''Must be writable to everyone.''' | ||
'''Series subfolder''' - created automatically | '''Series subfolder''' - created automatically | ||
'''Files limit in a subfodler''' - number of files stored in a subfolder inside '''Series subfolder''' | '''Files limit in a subfodler''' - number of files stored in a subfolder inside '''Series subfolder''' | ||
| − | '''CF card device name''' - GPS/IMU log is saved to the internal CF cards. On the master camera they are /dev/hda1 & /dev/hdb1 | + | '''CF card device name''' - GPS/IMU log is saved to the internal CF cards. On the master camera they are /dev/hda1 & /dev/hdb1 |
'''GPS/IMU log file name''' - absolute path (in the master camera)+ log base name | '''GPS/IMU log file name''' - absolute path (in the master camera)+ log base name | ||
'''Starting index''' - logs are named as follows - '''[base_name]-[index]''' | '''Starting index''' - logs are named as follows - '''[base_name]-[index]''' | ||
'''Records per file''' - number of records per log file. New file: an incremented index is added to the base name. | '''Records per file''' - number of records per log file. New file: an incremented index is added to the base name. | ||
</font> | </font> | ||
| + | |||
| + | <font size="2"></font> | ||
| + | |||
{| | {| | ||
|- | |- | ||
| − | |[[ | + | | [[Image:Recording tab.jpeg|thumb|500px]] |
|} | |} | ||
| − | |||
| − | |||
| − | |||
| − | <font size= | + | <br><br> |
| + | |||
| + | == Setting recording parameters: camera settings == | ||
| + | |||
| + | *Check camera settings at the '''Settings''' -> '''Camera'''-tab | ||
| + | |||
| + | <font size="2"></font> | ||
| + | |||
| + | <font size="2"> | ||
'''Trigger period,ms ''' - 1/FPS. | '''Trigger period,ms ''' - 1/FPS. | ||
'''Skip frames mask''' - hex 0x1ff - bit[8]=enable, bits[7:0] - '''1''' - record frame, '''0''' - skip frame - in an 8-frame sequence. | '''Skip frames mask''' - hex 0x1ff - bit[8]=enable, bits[7:0] - '''1''' - record frame, '''0''' - skip frame - in an 8-frame sequence. | ||
| Line 97: | Line 148: | ||
'''HDR mode''' - at the fps rate the dark and the bright images alternate. | '''HDR mode''' - at the fps rate the dark and the bright images alternate. | ||
| + | |||
| + | '''Skip Frames Mask''': | ||
| + | 0x1ff - frames are not skipped, camera is triggered at '''Trigger period'''. | ||
| + | 0x155 - the camera is triggered at '''Trigger period'''/2 but only every other frame is recorded. It makes autoexposure adapt quicker and in the '''HDR mode''' records only normally exposed images skipping the underexposed ones. | ||
| + | |||
| + | Recommended values for 1 fps: | ||
| + | '''Trigger period''' = 1000 (ms) | ||
| + | '''Skip Frames Mask''' = 0x155 | ||
| + | '''HDR mode''' = '''On''' | ||
</font> | </font> | ||
| + | |||
| + | <font size="2"></font> | ||
| + | |||
{| | {| | ||
|- | |- | ||
| − | |[[ | + | | [[Image:Camera tab.jpeg|thumb|500px]] |
|} | |} | ||
| + | |||
<br><br> | <br><br> | ||
| − | ==Recording== | + | |
| − | * '''Record'''-button to start recording | + | == Recording == |
| + | |||
| + | *'''Record'''-button to start recording | ||
| + | |||
{| | {| | ||
| − | |[[ | + | |- |
| + | | [[Image:Rec.jpeg|thumb|300px]] | ||
|} | |} | ||
| − | <br><br> | + | |
| − | ==Stopping== | + | <br><br> |
| − | * '''Stop'''-button for stop. | + | |
| + | == Stopping == | ||
| + | |||
| + | *'''Stop'''-button for stop. | ||
| + | |||
{| | {| | ||
| − | |[[ | + | |- |
| + | | [[Image:Rec.jpeg|thumb|300px]] | ||
|} | |} | ||
| − | <br><br> | + | |
| − | ==Downloading IMU/GPS Log== | + | <br><br> |
| − | * After stopping - go to the '''Settings''' - | + | |
| − | <br><br> | + | == Downloading IMU/GPS Log == |
| − | ==Checking the Recorded Footage== | + | |
| − | * Check the footage at the '''Absolute footage path''' - each panorama set should consist of 9 images named with a timestamp of when it was taken plus the index of the camera (seconds_microseconds_index.jp4): | + | *After stopping - go to the '''Settings''' -> '''Recording'''-tab to download the IMU/GPS log. |
| + | |||
| + | <br><br> | ||
| + | |||
| + | == Checking the Recorded Footage == | ||
| + | |||
| + | *Check the footage at the '''Absolute footage path''' - each panorama set should consist of 9 images named with a timestamp of when it was taken plus the index of the camera (seconds_microseconds_index.jp4): | ||
| + | |||
{| | {| | ||
| − | |[[ | + | |- |
| + | | [[Image:Footage folder structure.jpeg|thumb|300px|Footage folder structure.jpeg]] | ||
|} | |} | ||
| − | |||
| − | ==Links== | + | '''''Note:''' Missing files most likely means that the FPS is too high''. |
| − | * [[ | + | |
| − | * [[ | + | == Links == |
| − | * [[ | + | |
| − | * [[ | + | *[[Elphel Eyesis4Pi|Eyesis4Pi Main Article]] |
| − | * [[ | + | *[[Eyesis4Pi workflow|Workflow]] |
| − | * [[ | + | *[[Eyesis4Pi User Guide|User Guide - Recording]] |
| − | * [[ | + | *[[Eyesis4Pi Footage Procedures page|User Guide - Post-Processing: Footage Procedures]] |
| + | *[[Eyesis4pi Post-Processing|User Guide - Post-processing: ImageJ]] | ||
| + | *[[Eyesis4Pi data structure|Data Structure Description]] | ||
| + | *[[Eyesis4Pi Calibration|Calibration Process]] | ||
| + | [[Category:Eyesis4Pi]] | ||
| + | [[Category:User Guide]] | ||
Latest revision as of 12:41, 11 March 2013
Contents
[hide]Download
The GUI for recording is installed on the Eyesisbox PC by default.
There are several ways to install a newer version:
Terminal:
cd <any-path>
git clone git://elphel.git.sourceforge.net/gitroot/elphel/eyesis4pi_gui (initial checkout)
git pull (update)
SF.net:
http://elphel.git.sourceforge.net/git/gitweb.cgi?p=elphel/eyesis4pi_gui;a=tree
Follow the instructions in INSTALL.txt:
1. Install the following packages, terminal:
 sudo apt-get install php5 apache2

2. Make the src folder visible to the web server:
2a. Create a link, terminal: "sudo ln -sf <path-to-eyesis4pi_gui-folder> /var/www/eysisgui"
2b. Or copy all the files to /var/www/eyesisgui.
Note: "/var/www" is the (apache2) web server's document root folder.

3. Make the footage root folder "/data/footage" writable for everyone.
Equipment/Package
- Eyesis4Pi
- Switch
- PC / Laptop
Power On
- Turn the switch on.
- Connect the camera's ethernet cables to the power enabled ports. The camera boot takes about 1 min.
Important Notice: Use a fan to cool the camera's pole when shooting indoors.
Network Set Up
- Connect the PC to the Gigabit port of the switch.
- Configure the PC's network settings (Kubuntu Network Configuration Guide):
IP address: 192.168.0.68 (example)
Mask:       255.255.255.0
Note: Eyesis4Pi's default IP addresses: 192.168.0.221-229
System Tests
- Open the GUI page (the address is bookmarked in the Firefox and in the Chrome). The GUI address is:
http://127.0.0.1/eyesisgui/index.html
- Go to the "Settings" -> "Test"-tab:
- Follow the Open the test page-link, the tests are:
1. All the modules are online.
2. GPS locked
3. IMU detected
4. Internal CF cards are present
Setting recording parameters: storage paths
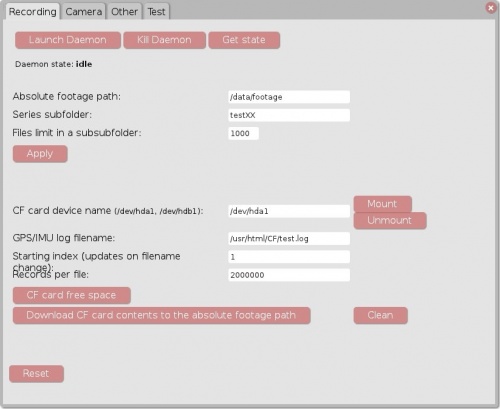
- Check paths at the Settings -> Recording-tab
Absolute footage path - the path to the folder where all the footage series are stored. Must be writable to everyone.
Series subfolder - created automatically
Files limit in a subfodler - number of files stored in a subfolder inside Series subfolder

CF card device name - GPS/IMU log is saved to the internal CF cards. On the master camera they are /dev/hda1 & /dev/hdb1
GPS/IMU log file name - absolute path (in the master camera)+ log base name
Starting index - logs are named as follows - [base_name]-[index]
Records per file - number of records per log file. New file: an incremented index is added to the base name.
Setting recording parameters: camera settings
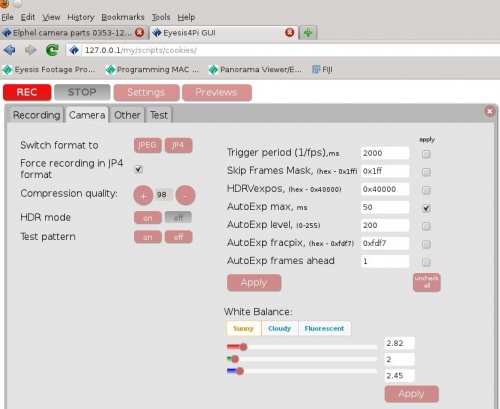
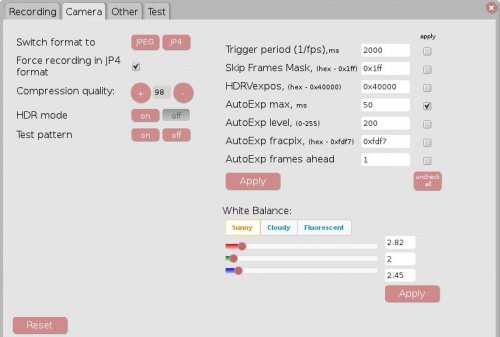
- Check camera settings at the Settings -> Camera-tab
Trigger period,ms  - 1/FPS.
Skip frames mask - hex 0x1ff - bit[8]=enable, bits[7:0] - 1 - record frame, 0 - skip frame - in an 8-frame sequence.
HDRVexpos - in the HDR mode - the darker frame multiplication coefficient to get exposure for the lighter frame.
AutoExp max, ms - the autoexposure value limit.
AutoExp level - value of a pixel at which the autoexposure works.
AutoExp fracpix - number of pixels below the Autoexp level.
AutoExp frame ahead - number of previous frames used for calculatin the current frame exposure.
Compression quality - JP4/JPEG compression quality.
HDR mode - at the fps rate the dark and the bright images alternate.
Skip Frames Mask:
  0x1ff - frames are not skipped, camera is triggered at Trigger period.
  0x155 - the camera is triggered at Trigger period/2 but only every other frame is recorded. It makes autoexposure adapt quicker and in the HDR mode records only normally exposed images skipping the underexposed ones.
Recommended values for 1 fps:
Trigger period = 1000 (ms)
Skip Frames Mask = 0x155
HDR mode = On
Recording
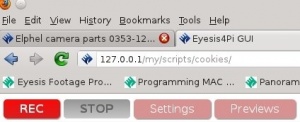
- Record-button to start recording
Stopping
- Stop-button for stop.
Downloading IMU/GPS Log
- After stopping - go to the Settings -> Recording-tab to download the IMU/GPS log.
Checking the Recorded Footage
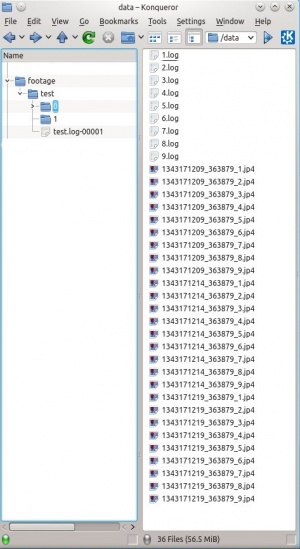
- Check the footage at the Absolute footage path - each panorama set should consist of 9 images named with a timestamp of when it was taken plus the index of the camera (seconds_microseconds_index.jp4):
Note: Missing files most likely means that the FPS is too high.
