Difference between revisions of "353 in a nutshell"
| Line 93: | Line 93: | ||
<tr><td>3300 milliwatts</td><td>back to streamer off</td></tr> | <tr><td>3300 milliwatts</td><td>back to streamer off</td></tr> | ||
</table> | </table> | ||
| + | |||
| + | ==Storage Media== | ||
| + | [[Image:NC353L-10369-COMPASS.jpeg|thumb|150px|Example: NC353L-10369-GEO with CF card and compass module installed]] | ||
| + | With [[10369]] interface board it is possible to connect any storage device using IDE or SATA that is supported by Linux. This also allows the connection of a hardware raid. | ||
| + | |||
| + | |||
| + | Elphel offers 2 hardware options for camera internal storage: | ||
| + | * 2 CF card slots | ||
| + | * 1.8" HDD. | ||
| + | |||
| + | Video can also be recorded over network (100MBit) on a host computer. | ||
| + | |||
| + | |||
| + | Video can be written/transferred in the following formats/containers: | ||
| + | * Apple Quicktime(R) | ||
| + | * OGM | ||
| + | * JPEG Image Sequence | ||
| + | * JP4 RAW Image Sequence | ||
| + | * Ogg Theora | ||
| + | * HDR | ||
| + | |||
| + | ==Additional Peripheral Devices== | ||
| + | |||
| + | * '''Soundcard (USB)''': adds the possibility to record/stream audio synced together with the video. | ||
| + | |||
| + | * '''GPS receiver (USB) & compass module (USB)''': allows geotagged video/still image recording. | ||
| + | |||
| + | * '''Micro Controller''': Allow the micro controller to take full control over the camera. [[Arduino | Arduino Example]] | ||
| + | |||
| + | ==[[Images_and_videos_examples|Images and videos examples]]== | ||
Latest revision as of 04:29, 18 April 2009
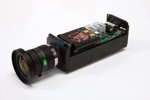
This page should give a very brief overview about all aspects of what the Elphel 353 camera is about.
Contents
[hide]Dimensions & Weight
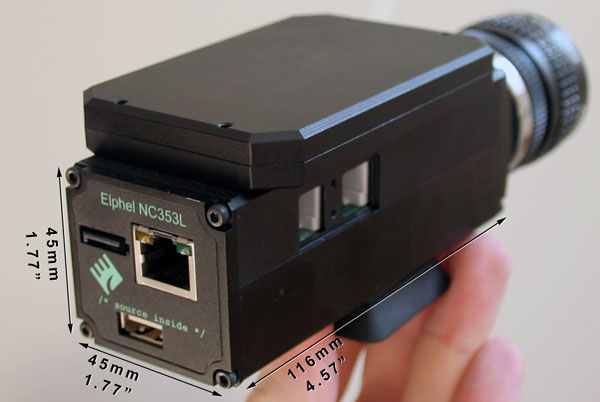
Example: NC353L-10369-HDD with 10369 IO board and internal 1.8" HDD installed:
Dimensions without HDD: 116mm х 45mm х 45mm
NC353L Weight: 150 - 215g (depending on installed internal hardware, excluding HDD)
Connectors
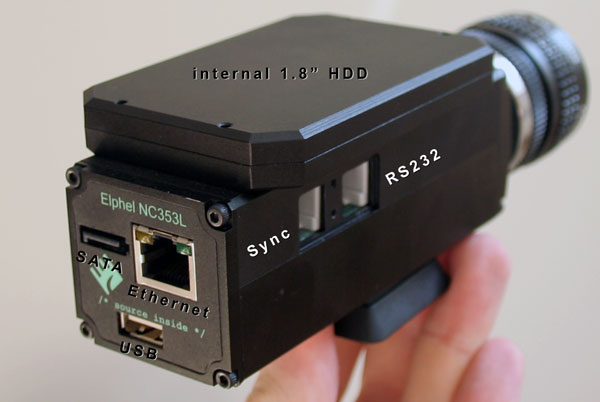
Example: NC353L-10369-HDD with 10369 IO board and internal 1.8" HDD installed:
SATA: Can be used to connect any external SATA device that is supported under Linux
Ethernet: 100MBit Network with 48V DC power provided through spare pairs (4/6 and 7/8)
USB: USB 1.1 with 5V power supply
IDE: Used to connect internal HDD
Sync: Can be used to sync multiple cameras or trigger shooting images externally
RS232: Access to Console and debug output
Internal Hardware Modules
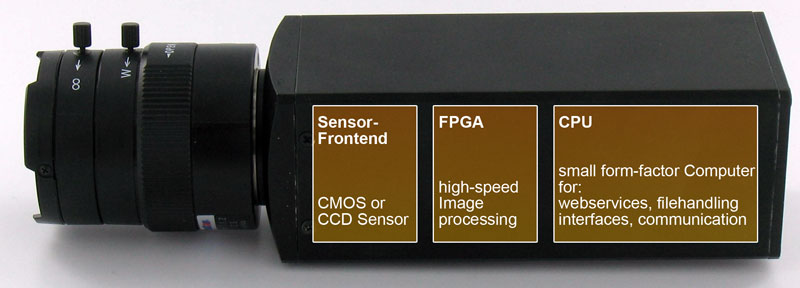
Strongly simplified the camera can be split up in 3 different hardware modules with their specific tasks:
Lens: The camera has a standard C-mount but ships with an adapter ring that allows to mount CS-lenses as well.
Sensor-Frontend: houses the actual sensor that delivers the digital image
- Aptina 5MPix CMOS (video sensor)
- Kodak 11MPix CCD (still image sensor)
- Kodak 16MPix CCD (still image sensor)
FPGA: (Field Programmable Gate Array) processes the incoming image data (color manipulations, compression, etc) in realtime
- Xilinx (R) Spartan3e 1200K gates
CPU: can direct the processed image stream (video) over a network or into a file (HDD or CF card), it can do all tasks a normal embedded computer can do (web server, peripherals, etc. )
- Axis ETRAX FS (200Mhz CPU, 64MB SDRAM, 128MB system flash memory, 64MB image memory)
Sensors
There are 3 different modules that can be used as sensor front-ends:
Aptina 5MPix CMOS:
This cost efficient bayer-pattern sensor has a size of 1/2.5" (5.70mm x 4.28mm) and a resolution of 2592x1944. It allows a maximum frame rate of around 15 fps @ full resolution, 30fps @ Full HD (1920x1080) or 60 fps @ HD (1280x720). It features a 12 bit ADC and supports: region of interest, on-chip binning and decimation.
Optionally you can request a 5Mpix monochrome or 3Mpix sensor upon purchase.
Kodak 11MPix CCD:
This high grade (also high price) full-frame (36mm x 24mm) sensor requires the 10347 controller and 10342 interface board as well as a mechanical shutter. It can supply a maximum of 5 fps. This setup is actually called model 363 not 353 anymore.
Kodak 16MPix CCD:
As above, but requires the 10347 controller and 10344 interface board board and a mechanical shutter. It can supply a maximum of 3 fps. No turnkey solution available.
Power Supply
There are 3 hardware configurations available to provide power to the camera:
- 48V DC power supply using the same cable as used for network connection.
- 12-36V DC for mobile applications with best efficiency at around 15V. This also uses the standard network cable. This works with any type of battery pack that can supply a stable current between 12-36V.
- single 3.3V source
Here are some results on power consumption test made in different configurations with Elphel 353 camera, 5MPix sensor, 10349 board, 1,8" HDD,....
| 2400 milliwatts | just booted |
| 3000 milliwatts | after setting image parameters |
| 3700 milliwatts | streamer on |
| 3300 milliwatts | streamer off |
| 3800 milliwatts | streamer on and somebody playing the stream |
| 5000 milliwatts | with streamer on and HD writing at full speed (dd) |
| 5800 milliwatts | streamer on, HD and USB-flash writing at full speed |
| 3300 milliwatts | back to streamer off |
Storage Media
With 10369 interface board it is possible to connect any storage device using IDE or SATA that is supported by Linux. This also allows the connection of a hardware raid.
Elphel offers 2 hardware options for camera internal storage:
- 2 CF card slots
- 1.8" HDD.
Video can also be recorded over network (100MBit) on a host computer.
Video can be written/transferred in the following formats/containers:
- Apple Quicktime(R)
- OGM
- JPEG Image Sequence
- JP4 RAW Image Sequence
- Ogg Theora
- HDR
Additional Peripheral Devices
- Soundcard (USB): adds the possibility to record/stream audio synced together with the video.
- GPS receiver (USB) & compass module (USB): allows geotagged video/still image recording.
- Micro Controller: Allow the micro controller to take full control over the camera. Arduino Example
