Difference between revisions of "10393 manual"
(→Notes) |
(→Notes) |
||
| Line 66: | Line 66: | ||
* Boot time: ~30s | * Boot time: ~30s | ||
* The default boot is from the on-board NAND flash. [[Boot_options_393|More information]] on available boot options and recovery boot | * The default boot is from the on-board NAND flash. [[Boot_options_393|More information]] on available boot options and recovery boot | ||
| − | * | + | * For a production system with rare changes to the file system it is recommended to boot from NAND flash. |
| − | * For development one can boot from the μSD recovery card and use it | + | * For development, one can boot from the μSD recovery card and use it |
==<font color="blue">Defaults</font>== | ==<font color="blue">Defaults</font>== | ||
Revision as of 17:27, 22 October 2018
Contents
[hide]- 1 In the package
- 2 Interfaces
- 3 Power on
- 4 Defaults
- 5 Command line access
- 6 Serial console access
- 7 Web user interface (camvc)
- 8 Download live images
- 9 Video
- 10 Event Logger (GPS, IMU, IMG & EXT)
- 11 Store/restore configuration
- 12 Change parameters
- 13 Image formats
- 14 Temperature monitor
- 15 eSATA port switching
- 16 Proper shutdown
- 17 Firmware/software update
- 18 Firmware images
- 19 Development
- 20 Other info
- 20.1 Change default ip address
- 20.2 Set up histogram window and autoexposure parameters
- 20.3 Tools for calibrated systems
- 20.4 Switch between ERS and GRR modes in MT9P006
- 20.5 External/internal synchronization & triggering and FPS control for single/multi-camera systems
- 20.6 SSD/MMC/USB formatting
- 20.7 Boot modes
- 20.8 Pointers monitor
- 20.9 Powering from batteries (12V or 48V)
- 20.10 Accessing raw pixel values
- 20.11 Photo finish (linescan mode)
- 20.12 Controlling multiple cameras from single GUI
- 21 Known problems
- 22 Notes
In the package
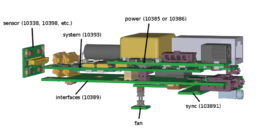
- 10393 camera system
- Power supply options (more information):
| Range | Power supply |
|---|---|
| 36-72V (default) | wall adapter (48V) |
| 18-75V | wall adapter (48V) |
| 12-36V | wall adapter, battery (12V) |
| 3.3V | direct, custom |
- CAT6 network cable
- μUSB-to-USB cable
- Recovery μSD card
- If the camera is calibrated the calibration data will be on a separate storage media or on the internal SSD (likely /mnt/sda1)
Interfaces
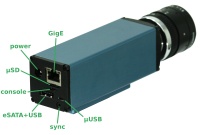
See Fig.1:
| GigE | gigabit network |
|---|---|
| μSD | micro SD card slot - boot or storage |
| console | serial console port, use μUSB-to-USB cable |
| eSATA+USB | 2-in-1. Connect USB or eSATA device. USB2.0 host |
| μUSB | USB2.0 host |
| sync | sync multiple cameras or other devices - input/output trigger signal through a 4-conductor 2.5mm audio plug with cable (example: digikey) |
Power on
- Plug in the power supply
- Connect to LAN using the network cable
Notes
- Boot time: ~30s
- The default boot is from the on-board NAND flash. More information on available boot options and recovery boot
- For a production system with rare changes to the file system it is recommended to boot from NAND flash.
- For development, one can boot from the μSD recovery card and use it
Defaults
| IP Address | 192.168.0.9 |
|---|---|
| User | root |
| Password | pass |
- The default IP address is set in the /etc/elphel393/init_elphel393.py.
- If present the internal SSD will be formatted into 2 partitions:
- /dev/sda1 - ext4 (~64-100GB)
- /dev/sda2 - raw partition (no file system) for fast recording
Command line access
- ssh from PC's terminal:
user@hostname:~$ ssh root@192.168.0.9
Serial console access
- Use a microUSB-USB cable to connect console μUSB port (see Fig.1) to PC - the cable's end should be thin enough otherwise interferes with an inserted mmc (multi media card = μSD card).
- In Linux the minicom program can be used
$ minicom -c on
Most likely the device will be /dev/ttyUSB0. Settings:
- 115200 8N1, no for hardware/software flow control
Refer to the following article for more details on using minicom: Using minicom to connect to Elphel393 camera
Web user interface (camvc)
- The page contains links to camvc user interface for each individual camera port.
- camvc was ported from the 10353 camera series:
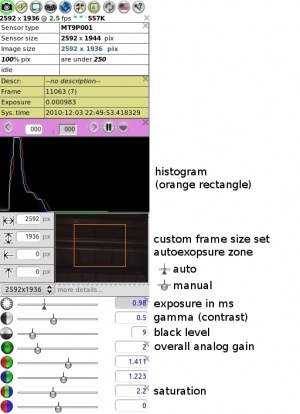
- change parameters like image format, resolution, auto exposure, auto white balance and more. Alternative way to change parameters is described below.
- pause compressor and search within buffered images
- help tips available - see Fig.3 - select then mouse over a control element of interest
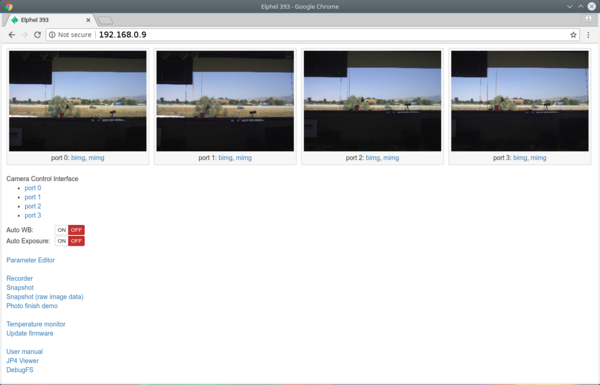 Fig.2 http://192.168.0.9 |
Download live images
camvc
- For a currently opened port (displayed in the window title and as "...sensor_port=0..." in the URL):
browser
port 0: http://192.168.0.9:2323/img
port 1: http://192.168.0.9:2324/img
port 2: http://192.168.0.9:2325/img
port 3: http://192.168.0.9:2326/img
command line
wget http://192.168.0.9:2323/img -O filename.jpeg
wget http://192.168.0.9:2324/img -O filename.jpeg
wget http://192.168.0.9:2325/img -O filename.jpeg
wget http://192.168.0.9:2326/img -O filename.jpeg
Video
Display
Multipart JPEG stream
http://192.168.0.9:2323/mimg
http://192.168.0.9:2324/mimg
http://192.168.0.9:2325/mimg
http://192.168.0.9:2326/mimg
RTSP
- turn on:
root@elphel393:~# /usr/bin/str
- url:
rtsp://192.168.0.9:554
rtsp://192.168.0.9:556
rtsp://192.168.0.9:558
rtsp://192.168.0.9:560
GStreamer
gst-launch-1.0 souphttpsrc is-live=true location=http://192.168.0.9:2323/mimg ! jpegdec ! xvimagesink
- mjpeg and rtsp
- More examples at Using GStreamer
Record
- Recording is done by the camogm program
- If recording to internal or external SSD, please, read about eSATA port switching
- important: Event logger (GPS, IMU, IMG, EXT) recording is started/stopped separately. See instructions below.
- For SATA devices camogm supports:
- recording to a partition with a file system - up to 80MB/s
- (default) faster recording to a partition without a file system (raw partition) avoiding OS calls - up to 220MB/s
- To extract data from a raw partition use dd or these scripts to get the data and split it into images. Follow this link for details.
- Can record to an mmc partiton or usb.
- More info
- If the prefix parameter, which is absolute path + prefix, for a channel is not set the file will be written somewhere to rootfs.
- if prefix is empty then the absolute path must end with a slash.
browser
Example 1: (provide a correct media mount point - /mnt/sda1/)
Follow this link for GUI description.
command line
Example:
- /home/root, file prefix=test_, 1GB or 10min files whichever occurs first
- setup and start (in one line):
echo "format=mov;status=/var/tmp/camogm.status;prefix=/home/root/test_;duration=600;length=1073741824;start" > /var/volatile/camogm_cmd
- stop recording:
echo "stop" > /var/volatile/camogm_cmd
sync
Event Logger (GPS, IMU, IMG & EXT)
Record
web
- Start:
http://192.168.0.9/logger_launcher.php?cmd=start&file=/mnt/sda1/test.log&index=1&n=10000000
- Stop:
http://192.168.0.9/logger_launcher.php?cmd=stop
- Help:
http://192.168.0.9/logger_launcher.php
command line
- start:
root@elphel393:~# cat /dev/imu > /path/filename.log
- stop - CTRL-C or kill the process
Read
- http://192.168.0.9/read_imu_log.php (will display help)
- on the first access creates /www/pages/logs/ (http://192.168.0.9/logs/)
- link the recorded logs to /www/pages/logs/
- refresh http://192.168.0.9/read_imu_log.php
Store/restore configuration
- http://192.168.0.9/autocampars.php - save/restore/initialize camera/sensor parameters per port. To (re)store parameters access the pages below:
http://192.168.0.9/autocampars.php?sensor_port=0 (stores to /etc/elphel393/autocampars0.xml)
http://192.168.0.9/autocampars.php?sensor_port=1 (stores to /etc/elphel393/autocampars1.xml)
http://192.168.0.9/autocampars.php?sensor_port=2 (stores to /etc/elphel393/autocampars2.xml)
http://192.168.0.9/autocampars.php?sensor_port=3 (stores to /etc/elphel393/autocampars3.xml)
- All stored parameters are automatically restored at boot
Change parameters
- http://192.168.0.9/parsedit.php - read/write parameters:
- POST request
Read:   http://192.168.0.9/parsedit.php?sensor_port=0&PAR1&PAR2
Change: http://192.168.0.9/parsedit.php?sensor_port=0&PAR1&PAR2 - update values - submit form
- GET request - XML response
Read:
        http://192.168.0.9/parsedit.php?immediate&sensor_port=0&PAR1&PAR2
Change:
        http://192.168.0.9/parsedit.php?immediate&sensor_port=0&PAR1=VAL1&PAR2=VAL2
Change for multiple ports at once:
        http://192.168.0.9/parsedit.php?immediate&sensor_port=0&PAR1=VAL1&*PAR1=MASK1&PAR2=VAL2&*PAR2=MASK2

# A port bit mask is set by adding a * to a parameter name, like *PAR1 - it is individual for each parameter.
# The mask is 4 bits - 1 bit per port, bit[0] = port 0,... bit[3] = port 3, where 1 - enabled, 0 - disabled:
#   0xf - the parameter's new value will be applied to all ports.
# More information
Note 1: if the parameter's value is specified in URL it will be applied. The call can have mixed specified and unspecified parameters.
Note 2: The new value is read on the next call.
Example:
- set 10 fps and enable output trigger signal
http://192.168.0.9/parsedit.php?sensor_port=0&immediate&TRIG_CONDITION=0&TRIG_OUT=0x66555&TRIG_PERIOD=10000000&TRIG=4
Notes:
- parsedit.php and autocampars.php were ported from 353 camera series. There are a few changes from the originals related to 4x sensor ports:
- parameters are individual for each sensor port - writing parameters to multiple port at once is controlled with a (bit-)mask input box
- if opened w/o sensor_port specified the page will show links to available ports
- sensor_port=x, where x=0..3 - in the address string - for a single sensor camera it is normally 0
Image formats
jpeg
- color: YCbCr 4:2:0, 3x3 pixels
- mono6: monochrome - color YCbCr 4:2:0 with zeroed out color components
- mono : monochrome - color YCbCr 4:0:0 with omitted color components
Note: Is not the best for processing since a lot of information is lost at demosaicing
jp4 raw
Temperature monitor
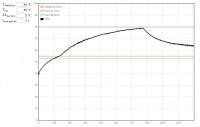
- http://192.168.0.9/hwmon.html:
- Tshutdown - automatic shutdown temperature level (default is 90°C)
eSATA port switching
- requres 10389
- available connections:
- camera <=> internal SSD (default)
- camera <=> external drive (external drive will need a separate power source)
- PC <=> internal SSD
- More information
Proper shutdown
- if not properly shutdown - μSD might get corrupted (run sync at least)
shutdown -hP now
Same effect:
http://192.168.0.9/autocampars.php?reboot
Firmware/software update
Firmware images
Changelog
==20180511==
* added cron program
* multi cameras control interface
* multi camera system info reporting
* fixed rtc
==20180416==
* 20180419 - mt9f002: fixed changing window size
* mt9f002: added triggered mode
* mt9f002: added vertical and horizontal flips (mirror)
==20180406==
* added initial support for MT9F002 sensor: no triggered mode, no binning/decimation
* display serial number in http://camera-ip:port/meta
* decode jp4s on the index page (http://camera-ip)
* turn off auto wb button for all ports on the index page
==20180130==
* added photo finish demo
* fixed fps limit calcs for triggered mode
==20180118==
* raw.py & raw.php, see wiki.elphel.com
* added python3 and python3-opencv
==20180116==
* raw pixel data downloading through membridge
* added gcc,make
==20180109==
* fixed autoexposure
==20171228==
* + strace, ltrace, dmsetup
* added to drivers: register devs to sysfs - nodes then created by udev
==20171226==
* kernel updated to 4.9 (from 4.0)
* lots of drivers is updated to newer versions
* +dm-crypt and cryptsetup
==20171120==
* bugfix - incorrect displaying of TRIG_PERIOD at init
==20171115==
* Fixed autocampars to let 10393 work with the mux board - 10359, see wiki.elphel.com for
  docs
==20170823==
* Fixed autocampars for multiple sensors getting desynced at init
* Fixed Garmin GPS 18x USB driver
==20170802==
* fixed a page for taking snapshots - works in chrome and firefox for bigger images (>2MB)
* enabled "Access-Control-Expose-Headers: Content-Disposition" and CORS
==20170627==
* viewing decoded jp4 format in camvc
==20170623==
* fixed incorrect default setting of the master channel
Development
Usage of SDK, which is Eclipse and project tree cloned from git.elphel.com, simplifies the development. At the same time lots of things can be done using Python, PHP, JavaScript or C/C++ (if compiled on hardware) and do not require SDK.
Other info
Change default ip address
- nano or vi
ssh root@192.168.0.9
pass
root@elphel393:~# nano /etc/elphel393/init_elphel393.py
edit - save
or
- sed
root@elphel393:~# sed -i.bkp 's/192.168.0.9/10.xx.xx.xx/' /etc/elphel393/init_elphel393.py
root@elphel393:~# sed -i.bkp 's/255.255.255.0/xxx.xxx.xxx.xxx/' /etc/elphel393/init_elphel393.py
Then:
#boot from NAND flash?
root@elphel393:~# overlay_sync 1
root@elphel393:~# shutdown -hP now
#powercycle
#boot from card?
root@elphel393:~# sync
root@elphel393:~# reboot -f
Set up histogram window and autoexposure parameters
Tools for calibrated systems
- Install ImageJ plugins
- decode jp4 raw format
- aberrations correction
- distortion correction (pixel mapping)
- rectification and projection
- JP46 Reader camera - decode JP4/JP46
- Eyesis correction - post-process JP4s using calibration data
Switch between ERS and GRR modes in MT9P006
External/internal synchronization & triggering and FPS control for single/multi-camera systems
SSD/MMC/USB formatting
Boot modes
Pointers monitor
- Displays sensor, compressor and buffer states per 10393 port:
http://192.168.0.9/pointers/
Powering from batteries (12V or 48V)
Accessing raw pixel values
Working with raw pixel data (how to capture raw images)
Photo finish (linescan mode)
Photo Finish (works for JP4 image format)
Controlling multiple cameras from single GUI
Known problems
- [SOLVED] Vertical artifacts in jpegs. Images are ok at 100% quality. Fixed, testing.
- http://192.168.0.9:232x/noexif/mimg - multipart jpeg displays corrupted frames from time to time. Reason: network bandwidth?
- [SOLVED] Sometimes on power-on (NAND flash boot) cannot mount the card's rootfs partition. Kernel Panics. Power off/on. Soft "reboot -f" works ok.
...
Kernel panic - not syncing: VFS: Unable to mount root fs on unknown-block(179,2)
...
- Changing exposure/quality/gains - can corrupt images - needs testing.
- After rewriting rootfs to μSD card - some of the cards get a corrupted partition - re-partitioning (reformatting?) solves the problem.
On the camera the rootfs is mounted as RW and some of the files are changed (also links created) -
most of the changes are now moved to tmpfs but something might have been missed.
Notes
- In case rootfs is on flash, it might make sense (or maybe not as the history is updated only once on session exit) to disable bash sessions command history - disable bash history
- When using overlays, deleting, existing in the lower layer, dirs can cause errors (hopefully it gets fixed someday), example:
- /mnt/sda1 exists in lower layer: /tmp/rootfs.ro/tmp
- upper layer is mounted to "/"
# rmdir /mnt/sda1
# mkdir /mnt/sda1
mkdir: cannot create directory '/mnt/sda1': Operation not supported
